yukonerdave
Well-Known Member
So I read up on Cop Runner?s light mod and decided it was a great idea. The install was easy, but somewhat more complicated than I anticipated, so I thought I?d add a step-by-step with pics just in case anyone has had this on the backburner. It takes less than half an hour and is totally worth doing.
<o></o>
First things first: the bulbs. I guess several varieties have been used but, at the suggestion and recommendation of several others on the original thread, I ordered LED?s online here
<o></o>
They were $1.19 each.
<o></o>
I got the ?[FONT="]74-x Wedge Base LED bulb? [/FONT][FONT="]([/FONT]about half way down the page). They seem to be working well. The only thing is that the temp gauge is considerably dimmer than the tach and the speedo. They sell 74-xHP and 74-xHP3 bulbs as well which are brighter, and I wonder if it wouldn?t work better to place one of those in the temp gauge. If anyone else has tried these, let us know.<o></o>
<o></o>
You will need a total of 4 bulbs, but they are cheap enough (and shipping is the same anyway) that it?s probably a good idea to get a few replacements, or a few in a different color in case you feel like trying something else.<o></o>
<o></o>
I take it that #74 LED bulbs are all the same and will work; also #24 or #37 standard bulbs also seem to work.<o></o>
<o></o>
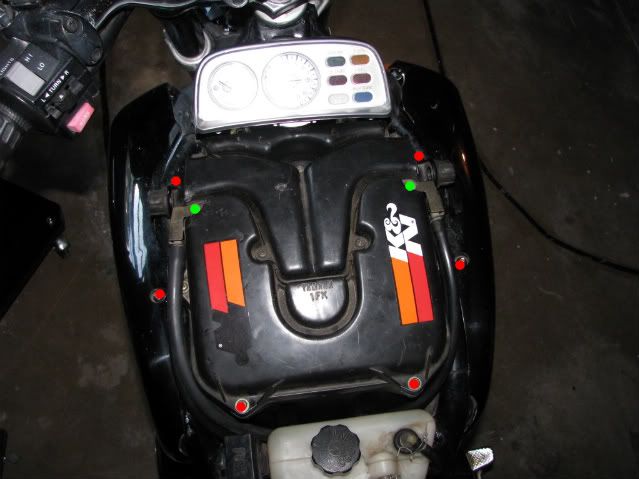
Ok, so to get at the bulbs you need to dismantle both the instrument gauge and the speedometer. I started with the instrument gauge. Remove the faux tank and you will see this:<o></o>
<o></o>
<o></o><o></o>
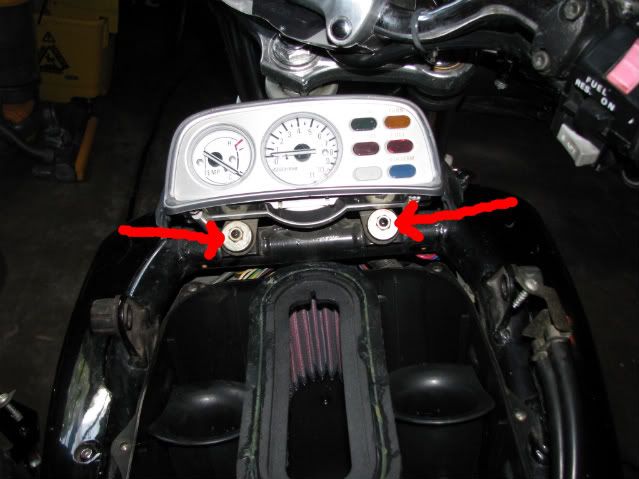
Remove all of the red marked bolts to take the air box cover off (you may also need to remove the green marked screws to take the hoses off in order to get at all the bolts). One the air box cover is removed you have access to these nuts/washers. Take em off.<o></o>
<o></o>
<o></o><o></o>
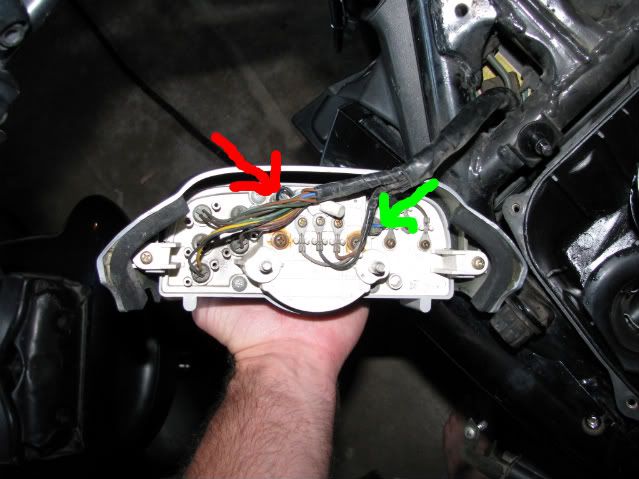
You can replace the bulbs without disconnecting the power to the instrument panel, which is fortunate because the wires are tucked away pretty good. Flip the unit over and remove the bracket. The bulbs you want to replace are marked in red (tachometer) and green (temp gauge). The bulb holders pull right out, but they may need a little GENTLE persuasion. With the holder out you can pull the bulbs straight out, and then push your new ones into place.<o>
</o><o></o>
<o></o><o></o>
The bulbs I got are polarized, so they only work if they are put in the right way. BEFORE DOING ANYTHING ELSE, turn your key on and make sure the bulbs light up. If they don?t, remove them and fit them in the other way. Everything goes back together in reverse order.<o>
</o><o></o>
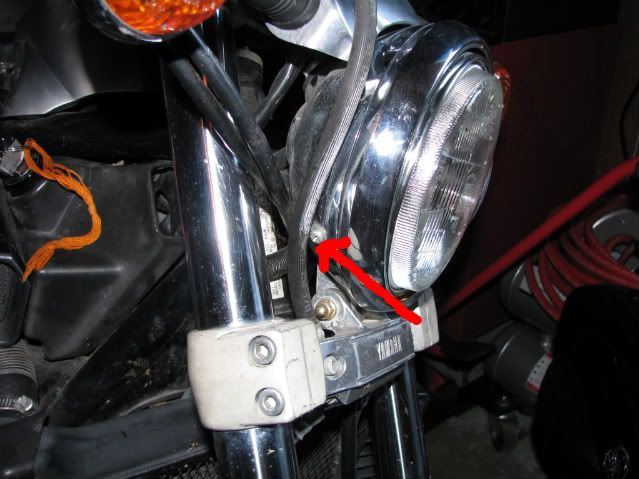
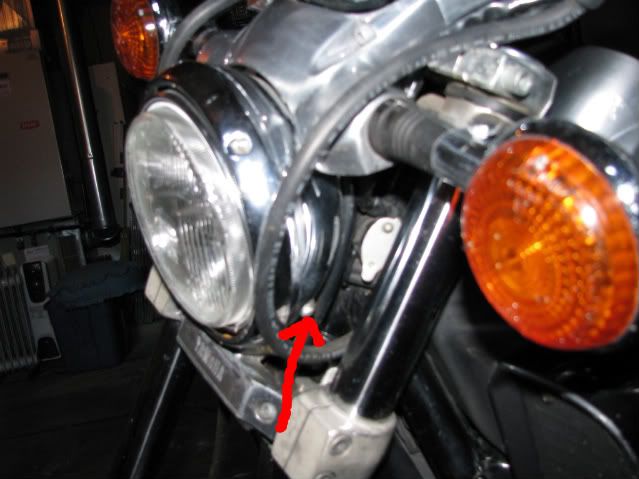
Now for the speedometer. You have to remove the headlight assembly in order to get at the bolts holding the speedo on. Start by taking the front of the headlight off by removing this bolt:<o></o>
<o></o>
<o></o>
<o></o>
And this one:<o></o>
<o></o>
<o></o>
<o></o>
Note that there is also a tab on top of the headlight holding it into the bucket. Once the bolts are out slide it down and out.<o></o>
<o></o>
You can remove the plug holding the headlight on and place it to the side if you want, or I suppose you could let it dangle. You do need to unplug the speedometer wire connection (the one with the hard plastic connector). Remove the nut and washer in the back of the bucket, and also the two Allen bolts holding on the ?YAMAHA? bracket just under the bucket. <o></o>
<o></o>
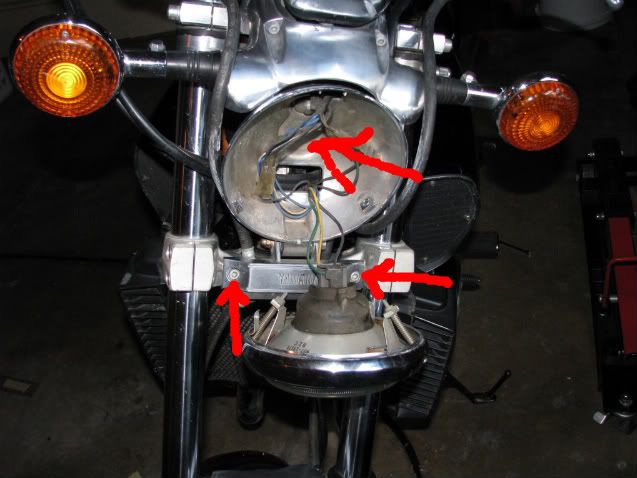
<o></o>
<o></o>
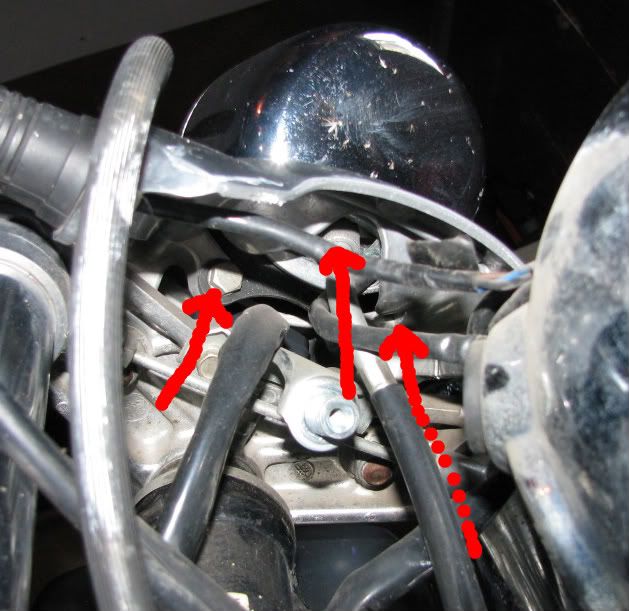
This should displace it enough for you to access the two bolts holding on the speedometer, as well as the speedo cable:<o></o>
<o></o>
<o></o>
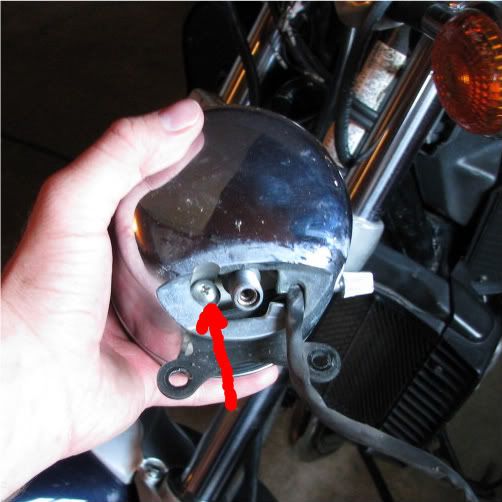
OK, now your speedometer should come out. There is one screw on the back holding it into the outer housing:<o>
</o>
<o></o>
You?ll need to remove the two nuts holding on the bracket in order to get at the bulbs. The bulbs are marked in green, and you can replace them in the same way as the others:<o>
</o>
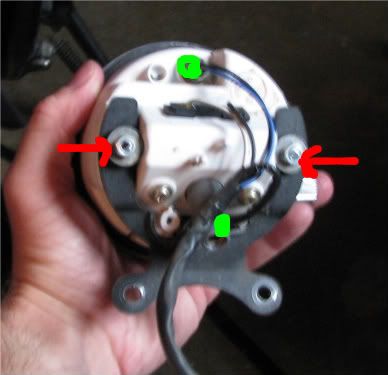
<o></o>
Here?s a pic of the bulbs (new one on the left and old one on the right) just for reference:<o>
</o>
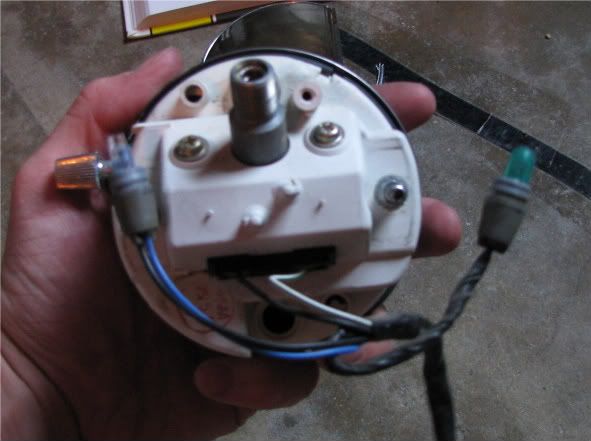
<o></o>
Again, MAKE SURE they light up before putting everything back together; they only work if they are put in the right way. Reassemble everything in reverse.<o>
</o> Here is the final product: I think they are pretty slick. Great idea Cop Runner!<o>
</o>
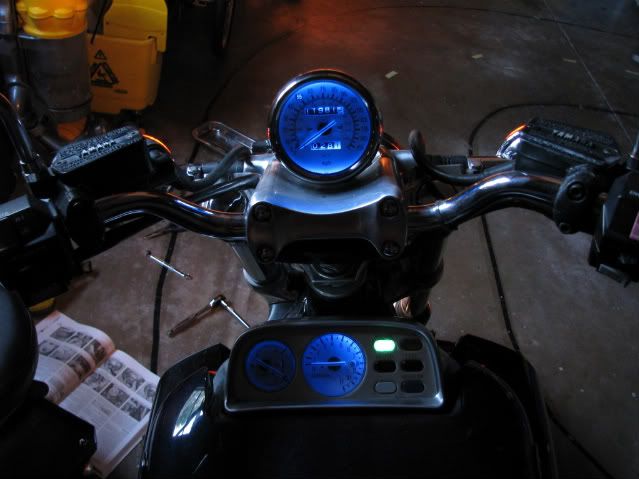
<o></o><o>
</o>
<o></o>
First things first: the bulbs. I guess several varieties have been used but, at the suggestion and recommendation of several others on the original thread, I ordered LED?s online here
<o></o>
They were $1.19 each.
<o></o>
I got the ?[FONT="]74-x Wedge Base LED bulb? [/FONT][FONT="]([/FONT]about half way down the page). They seem to be working well. The only thing is that the temp gauge is considerably dimmer than the tach and the speedo. They sell 74-xHP and 74-xHP3 bulbs as well which are brighter, and I wonder if it wouldn?t work better to place one of those in the temp gauge. If anyone else has tried these, let us know.<o></o>
<o></o>
You will need a total of 4 bulbs, but they are cheap enough (and shipping is the same anyway) that it?s probably a good idea to get a few replacements, or a few in a different color in case you feel like trying something else.<o></o>
<o></o>
I take it that #74 LED bulbs are all the same and will work; also #24 or #37 standard bulbs also seem to work.<o></o>
<o></o>
Ok, so to get at the bulbs you need to dismantle both the instrument gauge and the speedometer. I started with the instrument gauge. Remove the faux tank and you will see this:<o></o>
<o></o>

<o></o><o></o>
Remove all of the red marked bolts to take the air box cover off (you may also need to remove the green marked screws to take the hoses off in order to get at all the bolts). One the air box cover is removed you have access to these nuts/washers. Take em off.<o></o>
<o></o>

<o></o><o></o>
You can replace the bulbs without disconnecting the power to the instrument panel, which is fortunate because the wires are tucked away pretty good. Flip the unit over and remove the bracket. The bulbs you want to replace are marked in red (tachometer) and green (temp gauge). The bulb holders pull right out, but they may need a little GENTLE persuasion. With the holder out you can pull the bulbs straight out, and then push your new ones into place.<o>
</o><o></o>

<o></o><o></o>
The bulbs I got are polarized, so they only work if they are put in the right way. BEFORE DOING ANYTHING ELSE, turn your key on and make sure the bulbs light up. If they don?t, remove them and fit them in the other way. Everything goes back together in reverse order.<o>
</o><o></o>
Now for the speedometer. You have to remove the headlight assembly in order to get at the bolts holding the speedo on. Start by taking the front of the headlight off by removing this bolt:<o></o>
<o></o>

<o></o>
<o></o>
And this one:<o></o>
<o></o>

<o></o>
<o></o>
Note that there is also a tab on top of the headlight holding it into the bucket. Once the bolts are out slide it down and out.<o></o>
<o></o>
You can remove the plug holding the headlight on and place it to the side if you want, or I suppose you could let it dangle. You do need to unplug the speedometer wire connection (the one with the hard plastic connector). Remove the nut and washer in the back of the bucket, and also the two Allen bolts holding on the ?YAMAHA? bracket just under the bucket. <o></o>
<o></o>

<o></o>
<o></o>
This should displace it enough for you to access the two bolts holding on the speedometer, as well as the speedo cable:<o></o>
<o></o>

<o></o>
OK, now your speedometer should come out. There is one screw on the back holding it into the outer housing:<o>
</o>

<o></o>
You?ll need to remove the two nuts holding on the bracket in order to get at the bulbs. The bulbs are marked in green, and you can replace them in the same way as the others:<o>
</o>

<o></o>
Here?s a pic of the bulbs (new one on the left and old one on the right) just for reference:<o>
</o>

<o></o>
Again, MAKE SURE they light up before putting everything back together; they only work if they are put in the right way. Reassemble everything in reverse.<o>
</o> Here is the final product: I think they are pretty slick. Great idea Cop Runner!<o>
</o>

<o></o><o>
</o>


![Bovemanx Motorcycle Phone Mount Holder, [150mph Wind Anti-Shake][7.2inch Big Phone Friendly] Bike Phone Holder, Motorcycle Handlebar Cell Phone Clamp, Compatible with iPhone 16 Pro Max Smartphones](https://m.media-amazon.com/images/I/51F+1sontPL._SL500_.jpg)


