VMAX  Forum

Help Support VMAX Forum:

This site may earn a commission from merchant affiliate links, including eBay, Amazon, and others.
I wanted to keep the indicator light so I would know if my signals were on so I made my own diode assembly for $1.07 plus some parts I had on hand. If you don't already have some wire and heat shrink it may be worth buying it cause they are cheap. I bought my diodes at radio shack. See pics for wiring detail and part #'s. With the diodes installed the LED's flash but the flash rate is too fast. Some may not have an issue with it but I wanted to slow it down. In all reality, a dirt cheap way of making LED's work (at least it did on my bike) would be to just remove the indicator bulb. All is fine but the flash rate is high.


Where do you connect the two diodes, there is only one Brown wire that goes to the indicator...
I founded a crimp with two Brown wires far away in the main wire beam, is it this one?
 
left turn wire yellow
right turn wire green
Black is ground
I hooked a resister in line one to yellow and one green wire. then the other end to ground. My self canceling turn signals still work. Guys have just put a inline bulb hooked to each wire in the headlight housing and that works to.
 
Where do you connect the two diodes, there is only one Brown wire that goes to the indicator...
I founded a crimp with two Brown wires far away in the main wire beam, is it this one?

No. Both diodes go on the brown wire near the indicator bulb in the instrument cluster. Did you see the photos in the first post?

Its been awhile so bear with me here. Cut the two wires that feed the light in the instrument cluster. Brown and green. You need to extend one of the tails from the indicator bulb long enough to reach the negative wires on the back of the cluster. The other wirefrom the indicator gets both diodes soldered to it. Now, you connect the two wires from bike harness to the diodes.
 

Attachments

  • attachment.jpg
    attachment.jpg
    102.4 KB
With everything on LED (signals, tail light), I just needed to add the diode on the dashboard. I kept the stock relay and its self cancelation. I just gave up on the running lights front and back.

I was surprised I didn't have to change the relay.

Sent from my GT-I9100 using Tapatalk 2
 
The brown an brown/white wires were cut and connected to the ELFR, nothing more...

The ELFR will not allow self cancelling signals. You have a few options.

1. Keep as is and forget about self canceling
2. Remove the elfr and rewire the stock relay. Everything should work but the lights will flash fast
3. Same as #2 but add some resistors in the circuit and the flash rate will slow down
 
Of course the ELFR cannot...
I misunderstood you old post, i saw this :

dsc03710.jpg


And i thougt that with OEM and ELFR both connected, self cancellation was working...
 
upload_2019-11-13_22-29-37.jpeg

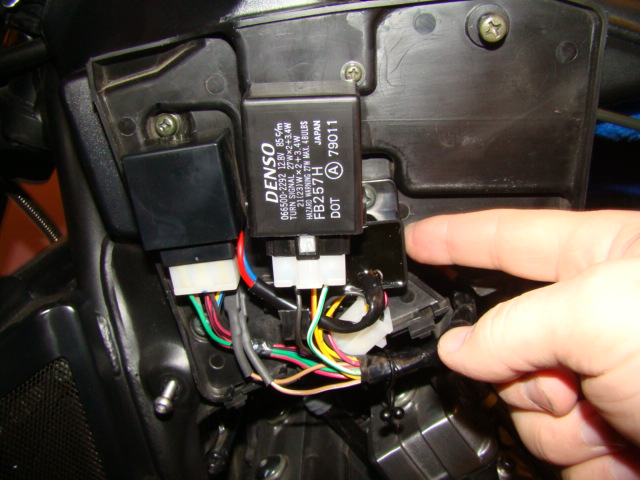
Can anyone tell me if the Original relay has any other function other than a relay? I’m asking because of all the extra wires going into the unit.
Thanks in advance
 
Hello, someone knows how to install this alarm, I received the instructions in Japanese. I can't find anything in English or Spanish. thanks, YAMAHA Alarm for Immobilizing Vehicle (A324). It is for second generation
 
Hello, someone knows how to install this alarm, I received the instructions in Japanese. I can't find anything in English or Spanish. thanks, YAMAHA Alarm for Immobilizing Vehicle (A324). It is for second generation
If you have a smartphone you can download Google Translate. Then you can open it and select Japanese and download that. Once it's downloaded choose Japanese to English (or whatever your preferred language to read is) and then click the little camera icon. You will probably get a prompt asking for permission to access your camera. Click accept. Then hold your phone over the text and it will turn the Japanese text to whatever language you chose. It will be a little weird as sentence structure and certain terms will be different but, it may get you the information you need to get the job done. Good luck!
 
Can anyone tell me if the Original relay has any other function other than a relay? I’m asking because of all the extra wires going into the unit.
Thanks in advance

Yes, the original relay unit has self-cancelling feature, it will turn off either after 10 seconds, or 150 meters (490 feet), whichever is greater BUT ONLY WHEN MOVING.

The 5 wires are:
black = 0v
brown = 12 V
brown/white = power to the lamps (on/off flash)
red/yellow = start signal
green/white = speedo reed switch

Brief operation. When red/yellow is grounded, the lamps start to flash by means of on/off power on brown/white wire and will do so until the indicator is cancelled by pressing in the switch on the bars or after either 10 seconds, or 150 meters (490 feet).

The green/white is signal from reed switch in the speedo head that is closed whenever a magnet goes past the switch (there are actually 4 of them). This is how the unit figures out not only that the bike is moving and also how far it has travelled.

It seems that the flash rate depends on the load so if LED lamps are fitted, the unit either stops flashing or flashes at incorrect rate, I wrote "seems" as the unit fitted to my bike flashes at the same rate regardless of what lamps are fitted or no lamps!, unfortunately that rate is too fast for UK.

Fitting an external relay as described means the self-cancelling feature is lost - the important wire here is the brown/white, the other connector to the replacement relay is 12 V which can for convenience be the brown wire or directly from the switched live.
 
Last edited:
Back
Top