paint/light bodywork....tips for a newbie?

VMAX  Forum

Help Support VMAX Forum:

This site may earn a commission from merchant affiliate links, including eBay, Amazon, and others.

RaWarrior

Well-Known Member
Joined
Jul 28, 2009
Messages
3,407
Reaction score
55
Location
Austin, TX
So I picked up a 03 Z1000 a couple weeks ago, mechanically it's perfect but the bodywork is a bit rough around the edges. It's obviously sat outside for a good deal of time, in direct sun. The "high side" of the paint is quite faded. It's also been laid down, there is maybe a 3" long "flat spot" road rashed into the edge of the tail fairing, as well as a crack in the headlight fairing. There's a small dent in the tank, but it's not big or ragged enough to be really noticeable, I'd just paint over it.

Any suggestions for "re-filling" the road rash? Some sort of bondo for plastic that could be filled and shaped back to the original curve(or close enough?)

Once the panels are smooth, what would be the best way to go about actually painting it? I don't have any paint guns, or even a compressor that would run one. It's a "naked", so the bodywork is pretty minimal. I've seen some rattle can job bikes that came out surprisingly well from using a primer, 2-3 color coats, and a clear. Stock color is a pretty bright orange so I'm sure it will need a primer and probably a couple coats to hide the old color. Though I was going to do gloss black, so that should hide pretty well.

can I just paint right over it after using preps-all or something? does it need sanding or the old finish stripped?

reason being I can't justify the cost of having it professionally done, and it seems kind of silly to buy paint guns and a big compressor for what would amount to literally maybe a minute's worth of spraying.

any suggestions or tips would be appreciated.
 
Paint is pretty simple. You can get some paint shops to mix the paint you want and put it in a rattle can, or just go with duplicolor. Just sand down the old paint with a fine paper. Old paint is a great primer, but if you want to go a different color they make a great primer. I'm going this route over the winter, I'm going to go with a candy red over a black base.

As for the rash, this stuff should do you good.
 
I have done a few things rattle can method and nobody would ever know the difference from a true spray gun method. As for primer and color I have used dupli color products. This may or may not be the best? The key is to follow those directions to get the base color properly cured. Then the key to rattle can is the clear coat! Look for Spray Max 2k! It's a 2 part rattle can finish that's as close to automotive. Lear as it gets. Spray it and let t dry, then wet sand it with 1500, then 2000, then use a good buffing compound, and then a polishing compound, to finish just wax. Do all the steps or each one skipped makes he next that much harder. Both compounds can take a little time but stick with it it will turn out awesome. I used a car orbital buffer to apply he compounds but if needed a good microfiber towel will work. Use seperate towels, and water for every step or you'll drag the heavier grit to each additional process. Here is a pic of the tank on my bike done via rattle can. ImageUploadedByTapatalk1340841701.625353.jpg
 
Thanks for the tips...that plast-aid seems like just the ticket for filling the rash and I've heard good things about that spraymax 2k before.

now....just to decide what color. always been partial to a black/red color scheme....why I like the 2007 max color so much. Silver was boring. Everything on the road some shade of silver or gray these days.

Gloss black, with the pearl black "effex" metallic spray over it for the main color, and a metallic red for the rad shroud....and have to something about the ugly orange wheels at the same time. Maybe try to time this so I do the chain/sprockets at the same time as paint, since I'll already have the back wheel off. Red wheels....hmmm....sounds familiar....lol
 
May I say, thats the best rattle can job I've ever seen without hijacking the thread.....


I have done a few things rattle can method and nobody would ever know the difference from a true spray gun method. As for primer and color I have used dupli color products. This may or may not be the best? The key is to follow those directions to get the base color properly cured. Then the key to rattle can is the clear coat! Look for Spray Max 2k! It's a 2 part rattle can finish that's as close to automotive. Lear as it gets. Spray it and let t dry, then wet sand it with 1500, then 2000, then use a good buffing compound, and then a polishing compound, to finish just wax. Do all the steps or each one skipped makes he next that much harder. Both compounds can take a little time but stick with it it will turn out awesome. I used a car orbital buffer to apply he compounds but if needed a good microfiber towel will work. Use seperate towels, and water for every step or you'll drag the heavier grit to each additional process. Here is a pic of the tank on my bike done via rattle can. View attachment 29995
 
i couldn't agree with OST more. spraymax 2k is the stuff to use for clearcoat. my wife had a little mishap with our kia sorento's door and a rock wall. tiny bit of bondo and we re-sprayed the door with a colour match from genesse paint out of utica ny. it was a tri-layer process because of the 'flake' colour and it looked great but the clearcoat made it look factory after just a bit of buffing. i challenged a gearhead buddy of mine to find where i did some bodywork on the car and he couldn't find it. we sprayed only half the door too so it blends well. if i could do it all over again i woulda cleared the whole door just as it took a little extra buffing at the blend line. i think it has a chemical in it that melts the existing clearcoat a bit and then hardens it all together. anyways its awesome stuff.

as far as prep we just lightly sanded, i think 2000 grit? maybe 1500 grit, the whole surface just to clean it and get the clear coat scuffed up.

Edit: heres a post i made a couple months ago:

http://www.vmaxforum.net/showthread.php?t=23734
 
fill in the cracks/rash, lightly sand the whole surface, clean, spray color, spray clear, buff. seems pretty simple. don't have a buffer, though the drill-ball thing would probably get the job done. just use a typical compound liquid for the final buffing(says equal to like 10k grit paper), then a coat of wax for the final shine?

what's the suggested wait between coats? the paints say dry to the touch in 30 min and handling in 1hr.

we waited i think a couple days for the wax.

i think also it was like you said 30m or so between coats and then let it sit overnight to fully cure, we didn't handle it until the next day but i'm sure you could after a couple hours.

also the spraymax is only good for about 24 hours once you release the hardener, the fridge/freezer will extend that slightly but just remember you have limited time, check the next day if you need another coat.

also had my wife send me this pic, can you tell which door was sprayed?
 

Attachments

  • IMAG0789.jpg
    IMAG0789.jpg
    35.2 KB
As for waiting times just follow the directions on the can. The spray max clear comes in two types. I used the rapid cut-in stuff. Real useable time once you released the hardener is more like 12 hours. The can says different but after 12 it will start to spray to heavy if not clumpy a bit. For the rapid cut-in I let it sit 24 hours then go ahead with the wet sanding ect.
 
Also from my exp. you will find some people talking about sanding the color coats as you go. Others can comment but for me it's not worth it at all. The color coat can be orange peeled and as long as you do a good job with the clear coat you can't see it at all.
 
Sounds good....this kind of advice and tips is what makes this forum so damn good.


The Z came in a black/red color scheme in 06, though after googling pictures I don't really like it. The color looks better on the Vmax, the Z looks better in brighter colors where IMO the Max looks better in darker ones. Found some pictures of a metallic red/white one that looked really sharp, as well as a blue/silver, though blue isn't really my color.

I might stick close to the original scheme....use the duplicolor burnt orange metallic for the main paint, and silver accents....that way the wheels wouldn't immediately clash horribly with the rest of it and might look a little better.
 
For any plastics I use a product called Bull Dog. It's a "flex primer". Since front plastic fairings and body parts flex at higher speeds this product works great.
 
Here's what I ended up doing...

For the silver trim pieces, I used Duplicolor "Metal Specks" Silver with a crystal clear lacquer clearcoat. These turned out quite nice, the silver being virtually identical in shade to the original, just more metallic and now without the scuffs and scratches.

The formerly gray side covers are now gloss black. One of these must have had some stubborn grease, despite scrubbing/washing all the pieces with purple power beforehand...one corner insistently would bubble and run. After wetsanding and another coat it came out pretty decent though. Not perfect, but it's the bottom corner on the "low side" of the bike so not really noticeable anyway.


For the actual color....stopped at the local autobody supply. Said they can't mix ColorRite codes, that their mixes are privately held and not available from anyone except them. So I just started flipping through a gigantic book of automotive colors. There's not a lot of bright metallic orange cars. In fact, there's none, not that I found. Oh well.

What I did find, and immediately fell in love with, was from the GM section...."Synergy Green Effect". Came on 2011 special edition Camaro's. Plus, a Kawasaki should be green, no? For some reason it just popped out as the perfect green. Bright, brilliant, beautiful.

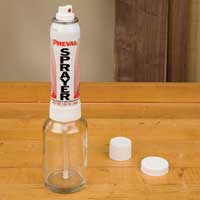
They could put it in a spray can, but I mentioned it was a bike and I'd be spraying the gas tank....they suggested against a rattle can since there'd be no hardener in the paint, and over time gasoline would take it off. I said I didn't have a spray gun or compressor....no problem. Handed me a little Preval spray gun...like a single use pre-pressurized paint gun, each good for up to a pint. Mix the paint to hardener 8:1, pour in the Preval, and spray. Said it'll give a much more even coat while spraying, and also dry to a hard, glossy finish, said there'd be no need for a clear with this paint.

So $90 got me a pint of color, a 1/2 pint of hardener(smallest amount sold), a big spray can of metal/plastic high fill primer, a Preval sprayer, and the mixing cup, strainer funnel, and stirrers. In the next couple days I'll do the prep...pull the pieces, fix the scrapes, scuff up the old paint.

Thursday I have off, so I'll probably paint then.

Said to not wax for 90 days....how long it takes for the finish to "fully cure".

Only issue now is that w/o the need for a clear, there's no real way to integrate a tank decal into it. Was going to get some custom decals made to sandwich between color and clear, but I guess I can pass on them and have a "nameless" bike. Worry is that unprotected decals will eventually come off or fade from washing, UV, ect and damage the paint underneath.

Thinking the ugly orange painted wheels will become solid black. Probably do that when I have the rear off for sprockets anyway.

I'll get some before and after shots.
 
whats this pre-pressurized sprayer look like? will a pint be enough for all the bodywork?
 
whats this pre-pressurized sprayer look like? will a pint be enough for all the bodywork?
30998-01-200.jpg

Most autobody shops carry these.
 
Just to add, I've done quite a few rattle can paint jobs. SkullDuggery in my albums is totally rattle can. I once did an Old Iron Sportster 2 tone red with pin striping and people couldn't believe it was a 30 YO Bike. With the right products and prep anything's possible...

Good Luck,
Dave
 
I hope a pint will do it, though that depends on how well it covers. Bright green over gray primer? Might need a couple coats.

I'm getting more skeptical, since I used half of a 15oz spray can of primer to just do the headlight fairing and the front fender. Still have the tank, tail, undertail, and rear fender to do. Then again that was covering bright orange, it took several swipes to completely mask it with primer.

Though it's not a real big deal to go get more color if needed. Mixed off a code. If it looks like I won't have enough to finish an entire piece, I'll go get more so there aren't two batches of paint on the same part. Think the pint was like $28 (and the half-pint of activator was $30)

I went a little overboard with the bondo for the tank dent so I have a lot of sanding to do, lol. The glazing putty worked well for the tail rash and "deep scratches" in the headlight fairing, sanded smooth easily. Won't say the repair is invisible under the primer, but it's pretty damn smooth. Once a bright metallic glossy color is over it, I doubt anyone will be able to notice.

This is the color....
images
 
I'm looking forward to seeing the finished product Ryan and I think it's great you're tackling this. That green will be a great color and with the black wheels should look awesome! :punk:
Mike
 
Back
Top