What did you do to your Vmax today? Part 2

VMAX  Forum

Help Support VMAX Forum:

This site may earn a commission from merchant affiliate links, including eBay, Amazon, and others.
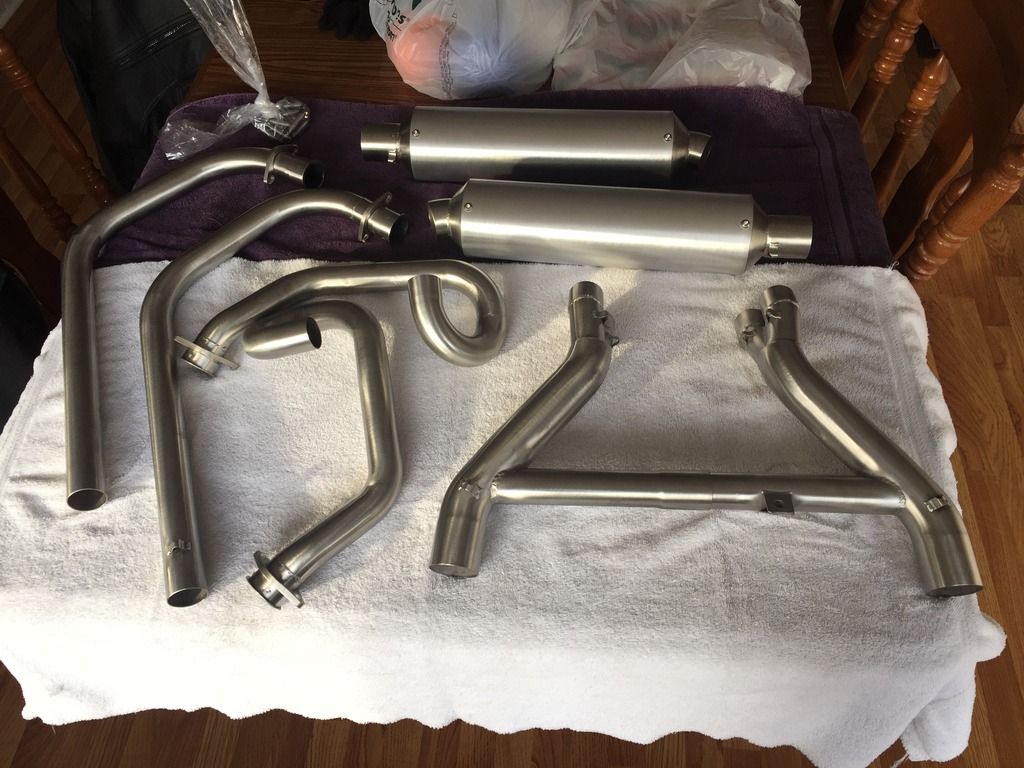
Well I actually didn't do anymore than open this box I got from Mark's Performance Exhaust. I'm a little overwhelmed just looking at it but I will figure it all out. I don't know yet what the bolt hole tab on the cross over pipe is for. Any words of advice before I tear into this project would be appreciated.

Marks%20exhaust_zpsn9w2gttp.jpg


That's nice exhaust. How much that run if you don't mind me asking?


Sent from my iPhone using Tapatalk
 
Thanks for the info. I was wondering if I needed to add an sealer. Is there a torque spec for the mounting bolts or just use the good n tight method? My bike only has a little over 2000 miles on it but it has after market exhaust so I know the gaskets have been off at least once so I probably will take your advice and replace. I did some searching and found two different exhaust gaskets one was a flat copper looking piece and the other was more like a collar. Is this the one I need? http://www.ebay.com/itm/2-PCS-OEM-Y...ash=item3f71b51850:g:C7YAAOSwRgJXkXfY&vxp=mtr

I'msure Yamaha has a set torque spec but not sure what it is. Here is what you need for the exhaust pipe to head gasket, one each per cylinder, nothing needed on the Marks exhaust joint, he does a awesome job with his friction fittings.
http://www.partzilla.com/parts/detail/yamaha/YP-3GD-14613-00-00.html
 
Thanks for the help. I think I will definitely get some new gaskets before I start the install.
 
Well I actually didn't do anymore than open this box I got from Mark's Performance Exhaust. I'm a little overwhelmed just looking at it but I will figure it all out. I don't know yet what the bolt hole tab on the cross over pipe is for. Any words of advice before I tear into this project would be appreciated.

Marks%20exhaust_zpsn9w2gttp.jpg

Spray the old nuts and bolts with penetrant a day or so before removal those pipes are beautiful
 
Thanks for the help. I think I will definitely get some new gaskets before I start the install.
Make sure you have a 8mm or 5/16 ratcheting wrench. Sacrifice a hex key by cutting 1.5-2" off the end.

The little stub and ratcheting wrench make it much easier to remove the nuts securing the exhaust to the cylinder head.

Sent from my SM-G930V using Tapatalk
 
Just took a ride to fill up my tank with ethanol free gas. 64 degrees in GA. A tad warm for January.
 
It's 60/80 kiln-dried sand I buy in 50 lb bags from Florida Silica Sand. Pretty-fine, so it doesn't leave as-much of a texture as another more-coarse grade of sand.

http://fsscompany.com/catalog/dried-sand/6080-fine-blasting-sand/

It does a good job of removal, that's a 20 lb pressure can from Harbor Freight http://www.harborfreight.com/20-lb-pressurized-abrasive-blaster-68994.html and for the small amount I do, it's OK. I suggest using a water trap on your air line, as it will help keep moisture from caking in the spray equipment's passages. I could shovel the sand up, sift it and re-use it to stretch its use, but I just buy a couple of bags, and sweep it into the yard when I'm done. That gets an engine done. I've painted w/cans in the past, I don't think there's any need to use a gun, I have several, but it's more trouble than it's worth. I suppose if I was going for an OEM look, I'd remove the side engine covers and spray them individually using a gum. I'm not going for that look.

Have any members done powdercoat on engine side covers? It seems that after a few months of riding, I just end up w/wear to the base metal on the clutch cover rear, especially. I don't know if powdercoat would be more-durable. Lastr time I sprayed, I used Seymour satin black in a spray can. It was pretty-durable and I was thinking this time I might try a semi-gloss.
What kind of media are you using FM?
 
It's 60/80 kiln-dried sand I buy in 50 lb bags from Florida Silica Sand. Pretty-fine, so it doesn't leave as-much of a texture as another more-coarse grade of sand.

http://fsscompany.com/catalog/dried-sand/6080-fine-blasting-sand/

It does a good job of removal, that's a 20 lb pressure can from Harbor Freight http://www.harborfreight.com/20-lb-pressurized-abrasive-blaster-68994.html and for the small amount I do, it's OK. I suggest using a water trap on your air line, as it will help keep moisture from caking in the spray equipment's passages. I could shovel the sand up, sift it and re-use it to stretch its use, but I just buy a couple of bags, and sweep it into the yard when I'm done. That gets an engine done. I've painted w/cans in the past, I don't think there's any need to use a gun, I have several, but it's more trouble than it's worth. I suppose if I was going for an OEM look, I'd remove the side engine covers and spray them individually using a gum. I'm not going for that look.

Have any members done powdercoat on engine side covers? It seems that after a few months of riding, I just end up w/wear to the base metal on the clutch cover rear, especially. I don't know if powdercoat would be more-durable. Lastr time I sprayed, I used Seymour satin black in a spray can. It was pretty-durable and I was thinking this time I might try a semi-gloss.

I have and you're right, it's not as durable as it should be. It still rubs off if in contact with my boots. I ended up stripping it off my clutch cover and having it polished.
 
Flushed the coolant and refilled with Toyota Pink 50/50. New fuel filter, new airfilter, oil and filter change. Discovered the PO had left the crankcase hose disconnected from the bottom of the airbox. Tried out my new Vmax Cover. It is actually for the gen 2 vmax, but fits well.
 

Attachments

  • 20170114_180519.jpg
    20170114_180519.jpg
    66 KB · Views: 20
  • 20170111_203532.jpg
    20170111_203532.jpg
    46 KB · Views: 23
It's a real pain that crankcase hose- seems they took the easy option!


Sent from my iPhone using Tapatalk
 
It's a real pain that crankcase hose- seems they took the easy option!


Sent from my iPhone using Tapatalk

I was able to get mine back on, lift the anti-freeze reservoir out of the way, and get a longer pair of needle nose in there.
 
I was able to get mine back on, lift the anti-freeze reservoir out of the way, and get a longer pair of needle nose in there.

I lift the reservoir out as you mentioned and usually just give it the reach around.

Sean
 
I had the coolant reservoir out and that is how I saw it. I was able to put it back on with my hand, but couldn't get the ring back on that holds it in place.. May have to pull the air box and put it back on if it doesn't stay in place.
 
I replaced that ring with a worm drive hose clamp. A 1/4" spinner handle with extension and socket make it easy

Sent from my SM-G930V using Tapatalk
 
Put a cable tie on the ring compressing it and nudge it up then cut it which will clamp it


Sent from my iPhone using Tapatalk
 
I have been thinking about drilling a hole in the airbox to run the hose through a grommet into the air box then connect it to a tee fitting which is connected to where the factory breather connect to the stacks. That should solve future aggravations. I already have the additional crankcase breather coming off the oil fill cap that is tee'd into where the factory breather tube connects to the airbox.

EDIT: I wonder if this would, over time, dump enough oil into carbs to foul things up there or at the spark plugs?
 
EDIT: I wonder if this would, over time, dump enough oil into carbs to foul things up there or at the spark plugs?

I dont think so.

What size hose do you have going from the oil fill cap to the airbox? I have seans kit, and so have a similar set up. Instead of still using the flimsy PCV hose, I replaced everything with 1/2 inch fuel line (I think). Its stiff enough that when you take the airbox off, it will stay in place......so putting the airbox back on is a snap. Remove the reservoir, and the hose is right there, make certain that it matches up to the nipple on the bottom of the airbox, and push the airbox back in place. Make is SO much easier......especially if your pulling the airbox multiple times for tuning....etc.
 
Back
Top