How To: Update older model shift segment

VMAX  Forum

Help Support VMAX Forum:

This site may earn a commission from merchant affiliate links, including eBay, Amazon, and others.
The segment and clutch are two completely different items and they won't even have a clue that the segment can even be updated. I see you have a 2000 listed so it's got the newer segment anyway.

I'm also sure they didn't do the DD Clutch mod unless you got someone really Vmax.
 
hi all, am just about to install new segment ,so far been easy job ,however what worries me is i havent been able to trace the old dowel that dropped out ,tried flushing it out ,and probing around with a magnet,i don't really no what else to do! is it possible the dowel could have been chewed up ?
 
I'm sure it's in there somewhere, but it probably dropped from the little alcove for the clutch down into the actual oil pan. I was lucky and found all the pins that had fallen out of mine in the little alcove so they were all accounted for.

I'd get a strong magnet and slide it around the oil pan, covering all of it(hoping to grab the pin through the pan), then slide it where you could get a pencil magnet down through the space at the clutch, see if you can fish it out. I also wouldn't be surprised it it's stuck to the oil drain plug's magnet....maybe get a catch pan and pull it? Just get a clean container and put the oil back in afterward if it's not time for a change yet.
 
just chg another segment, man it runs way better now, shifts smooth............
 
Last edited:
Just ordered all the parts above, because now and again when accelerating in 2nd (after a textbook shift) Max will rev and lurch twice as if it was slipping into gear after a bad shift.
I'm hoping it's something like old oil playing with the clutch or a bad shift segment but as I'm going to have the motor out in a week or two to put in solid mounts and a new shifter oil seal I thought I'd try this too
 
Thank you Youkon for the write up and the all the photo's. I was not sure if I could have done it so easily and as fast, under 3 hours, without the step by step photo's and comments. It looks as easy as the photo's show. I now have a new clutch and the updated shifter segment in place and the finding the gears is much better and clutch lever feels normal again. I had lost 2 of the pins with the older style neutral and 5th.
 
Hello I have a 98 vmax I put in the new shift segment while cycling through the gears the arm that rides on the star falls behind it.
any help please. Can I put a washer behind the arm? Or is something else wrong or missing?
 
Do you still have the pictures? If so, would you be willing to post them again on IMGUR or another site where you can link to them?

Pics are good, you'll need a browser ext. to view them now. Thanks to Photo Bucket. This all inspired me to do this upgrade today. The parts are sitting in a box next to my bike.
 
This is AWESOME news, also for the other forums I attend!:clapping::th_peace:

:party:
 
There is a stickied thread about this upgrade HERE, but I thought a step-by-step with pics might be helpful. I gather that pre-99 model vmax's have a shitty segment that is prone to fail. More than one guy has called this upgrade one of the best things you can do for an older Max. I took it entirely on their word - haven't had her running yet to see if its made any noticeable difference, but at least I don't have to worry about it failing in the future.

I was pretty intimidated by the thought of pulling the clutch in order to do this one myself, but it really wasn't so bad. For tools you will need:

-5mm allen key
-T30 torx
-10mm socket
-12mm socket
-1 3/16ths socket (that's one [inch AND 3/16ths] socket, not one 3/16ths socket)

For parts you will need:

4NK-18185-00-00 SEGMENT Qty: 1
93604-12037-00 PIN, DOWEL Qty: 5
93604-16092-00 PIN, DOWEL Qty: 1
3JP-15462-00-00 gasket crankcase cover Qty: 1
and maybe a 90151-06013-00 torx bolt to replace the one you're gonna take out (it is prone to stripping)

Drain the oil before starting!

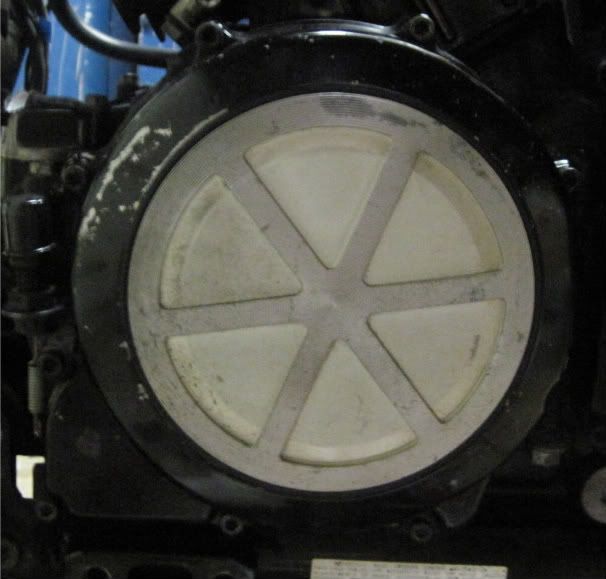
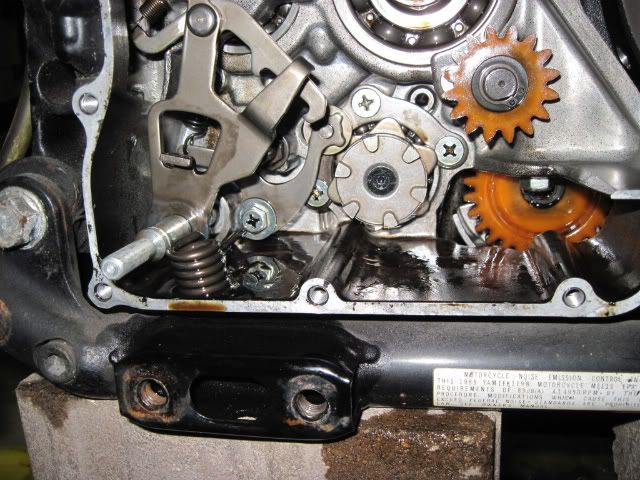
Start by removing the cover screws, in a criss-cross pattern. Before doing this, you'll need to remove the footrest and rear brake assembly:

IMG_0033.jpg


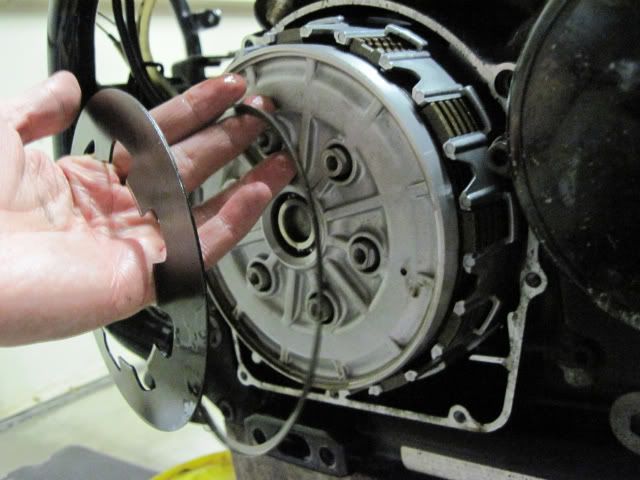
Be prepared to catch some more oil when you remove the cover. Remove the old gasket (I had to scrape parts of it off with a knife), and take note of the two small dowels in the 10:00 and 2:00 holes. Now remove the diaphragm spring retainer plate by slowly loosening the bolts, again in criss-cross pattern:

IMG_0032.jpg


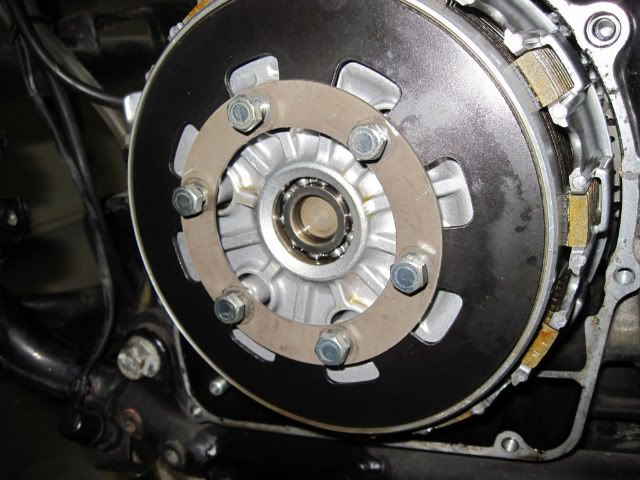
Once the bolts are out you will remove the retainer plate, the diaphragm spring, and a large ring spring seat:

IMG_0031.jpg


The pressure plate immediately behind these can also slide out:

IMG_0030.jpg


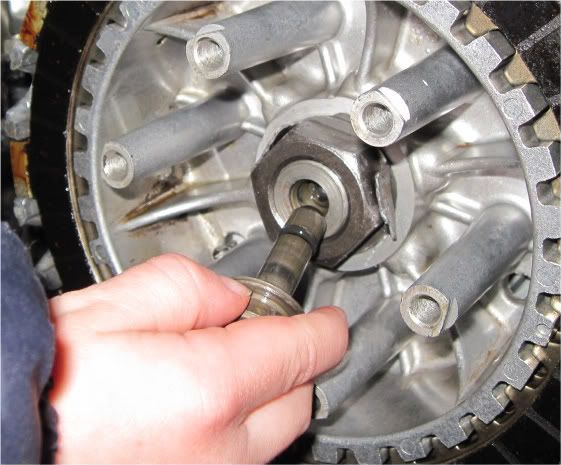
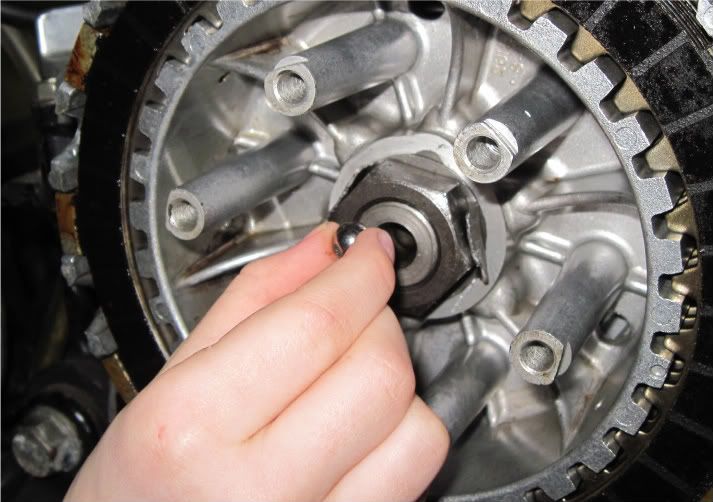
Now you can pull out the pushrod in the center, and also a small steal ball right behind it. I had to use a small magnet to grab the ball:

IMG_0029.jpg


IMG_0028.jpg


All of the clutch plates can now be removed. Make sure that you keep them in the same order - the outermost one in particular is different from the rest and must be put back in the same place. Also note their alignment. I replaced them according to the Haynes manual, which says to align the ridged tooth on each friction plate with the two dots on the outer housing, and then to align the wide gap on the outermost plate in the same place (refer back to this pic on re-install if needed):

IMG_0027.jpg


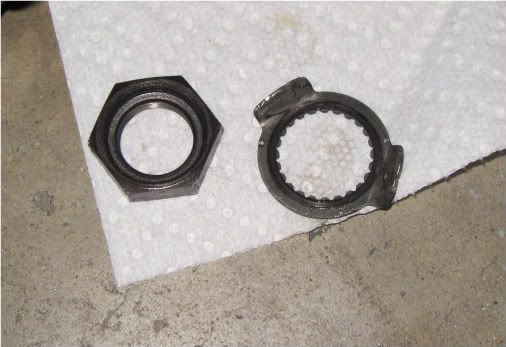
There is a large nut in the center that need to be removed. First, bend back the tabs on the lockwasher:

IMG_0010.jpg


Now you need that big 1 3/16ths socket. Easiest way to get it seems to be just by pulsing it with an impact gun. I have a cordless electric impact and it worked fine. Alternately, you can find something to hold the inner housing with so that it doesn't move when you turn the nut (maybe an oil filter wrench?). Remove both the nut and the lockwasher:

IMG_0011.jpg


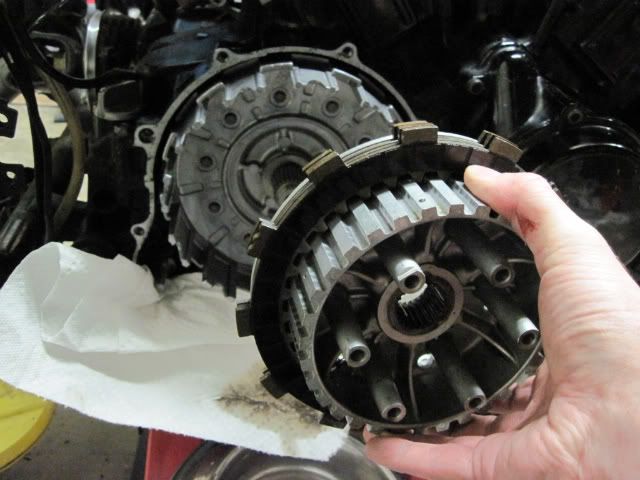
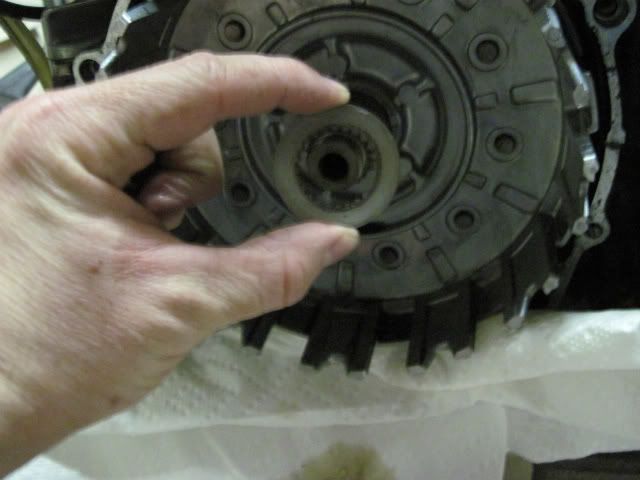
Slide off the clutch center and the washer behind it (I still had a few plates on it but yours should all be off and together):

IMG_0012.jpg


IMG_0013.jpg


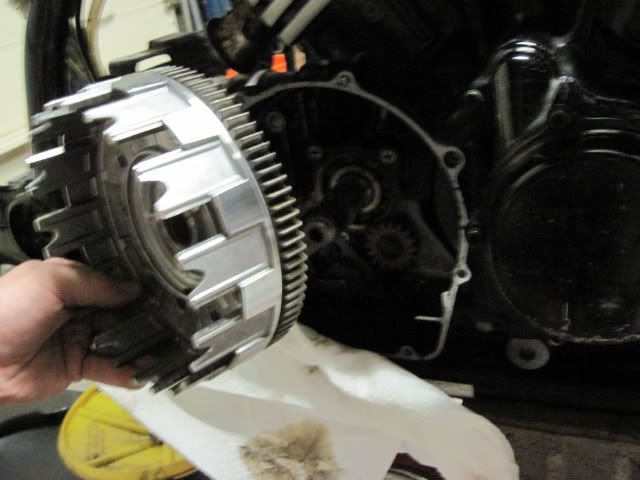
And now you can slide off the final outer housing:

IMG_0014.jpg


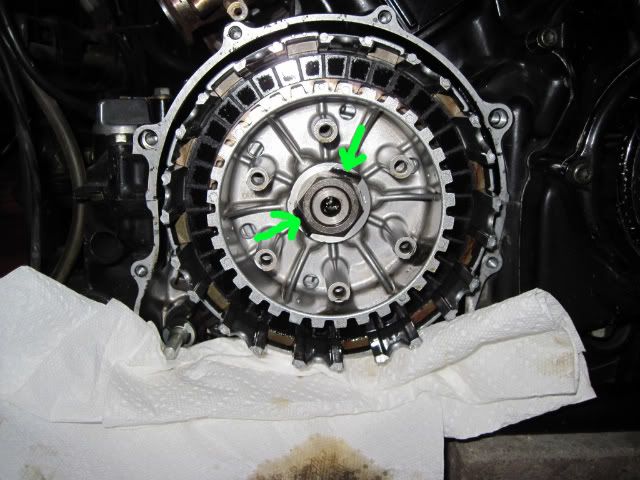
Should look like this:

IMG_0015-1.jpg


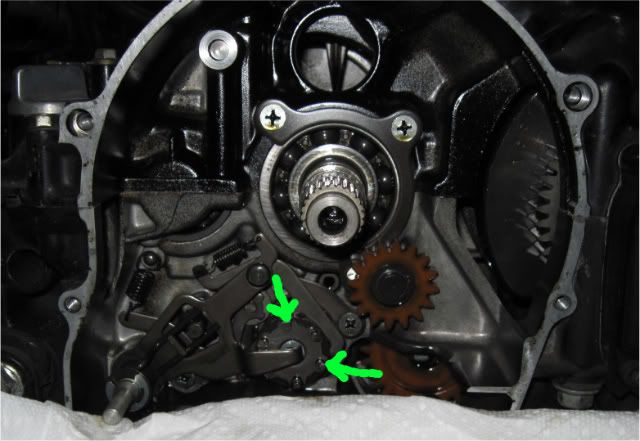
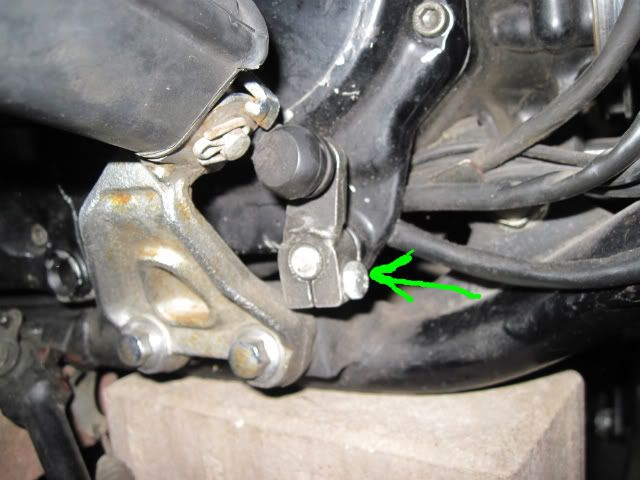
Note the 6 tabs on the segment (I arrowed two of them). If your segment has failed these tabs may already be pressed outward, and one or more of the pins behind the tabs may have fallen out. Make sure they are all accounted for. Before you can remove the old segment, you need to bring the shift shaft forward to make room. In order to do this, remove the clamp bolt on the other side of the bike where the shift lever connects to the crankcase:

IMG_0017.jpg


With that bolt removed, you should be able to loosen the "fingers" from the shift segment and bring the entire shift shaft forward to make room. I also released the spring but I'm not sure that was necessary (note that I already have the new segment installed in this pic):

IMG_0020.jpg


CAREFULLY remove the torx bolt holding on the old segment. The head is pretty soft and it is in there tight, so I guess it is easy to strip it. I got lucky, but I could feel it slipping a little.

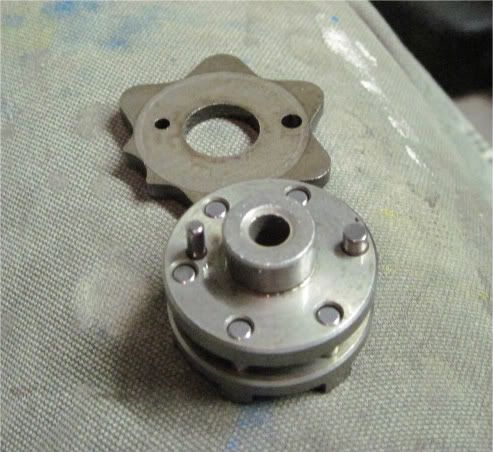
With the bolt removed, pull out the old segment along with the star behind it, being careful not to let it fall apart. Now you need to assemble the new segment. You will need the smallest rod from the old unit, the five new short rods, and the one new long rod. Fortunately, it looked to me like there is really only one way to make this thing go together, so I don't think you can get it wrong. Here's what it should look like:

IMG_0019.jpg


The star, then, sits on top. You can place the new unit back in, resting the small circle "finger" into the odd shaped groove of the star:

IMG_0020-1.jpg


And that's it. Everything goes back in reverse order. Remember the order and alignment of the clutch plates: you put a friction plate in first (the ones with the large outer "teeth", aligning the double-notched tooth with the two dots on the outer housing. Follow this with a plain plate, and then another friction plate, aligned the same way. Continue this until you finish with the outer friction plate, aligning the wide grooved tooth with the other double-notched teeth.

At least, this is how Haynes describes the order and alignment. If there is another way to do it, or if it really matters, I'd sure like to know.

You're done - go crack a cold one, you deserve it!
Hey, new here i have the same issue here can anybody tell me how tight should that center screw with that washer be? My new parts are supposed to come on next week and i want to show my new bike to thi really cute girl. But im just a person with bad luck with any bikes haha. And do you guys know by any chance what type of the oil i should put in my V max i heard half syntgetic is the best. Thanks guys 😁
 
Thanks Fire-Medic, you guys have helped my so much learning about the bike and actually finding this problem on my bike. I was really intimidated once Vmax didnt want to shift to 4-5th. And the crazy dude from whom i bought the bike said that he has a cousin who fixed that bike and knows it best. So i gave him a call for him only to say "Im not doing that anymore" and i was annoyed more than pissed. Everything in my life i had to learn how it works, how to fix it ect. My previous bike was a black Yamaha Virago 535 and that little bike was cursed aswell, shit would just break willy nilly and u spent most of my time fixing it. And so after deciding that i need a bigger bike i knew Vmax was it hahaha. So i got some money and decided to give the crazy dude my Virago and 2300€. He said he put some better carburators, new tires, new headlight bulb, a weird little alternator system, bigger stronger battery, hydraulic clutch system i think, the gas tank has been cleaned and repainted and it was basically indestructable. But i guess the shift segment went to shit and the bike gets really hot after 20 mins of riding, its usually 35°C here and say asphalt is going to be even hotter so i can see why but my lil yamaha virago was flying through that heat no issues and i noticed i go through my fuel really fast. So i just wanted to fix this thing by myself and take a picture to that old man saying i didnt need any help ( he said i shouldnt touch anything or im gonna fuck something up ) fix thr paint bcs i look like a traffic cone wifh this ugly orange on it and adjust the littke details. But i have been enjoying the bike. Thanks everyone and to you old timers that have this little santuary talking about these problems. Much love from Serbia.
 
Flush the cooling system with a good cleaning product & be sure to rinse it thoroughly, then re-fill.

A prior owner may have removed the thermostat or replaced it w/a wrong one. That could make it run hot.

I would check for a presents or absence of the proper thermostat and use of a candy thermometer in a pot of water on the stove to check and see at what point it opens. If you look in the search function for replacement thermostats you can find a list of car thermostats that will work in our vehicles much cheaper than the factory thermostat. There are also cross references for electrical switches for the coolant system as well. Some people add a on/off switch to turn the fan on manually.
 
Back
Top