Setting dry float levels on the bench

VMAX  Forum

Help Support VMAX Forum:

This site may earn a commission from merchant affiliate links, including eBay, Amazon, and others.
I'm confused. Perhaps you guys can help shed a bit of light on this.

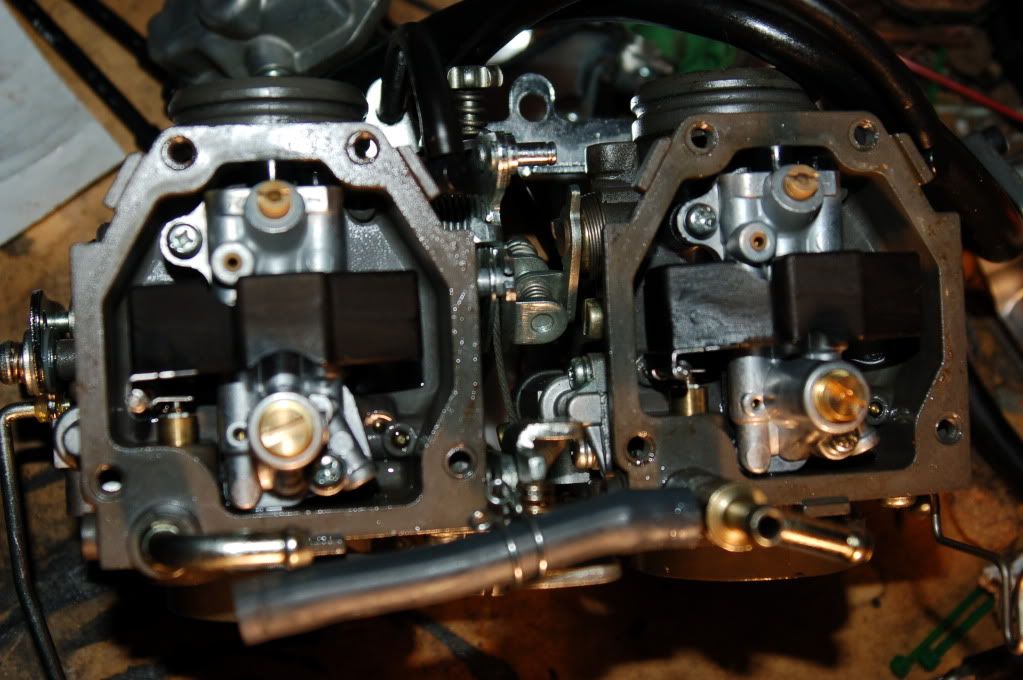
First off this is what I see when I open the floatss on unaltered carbs from an 01.
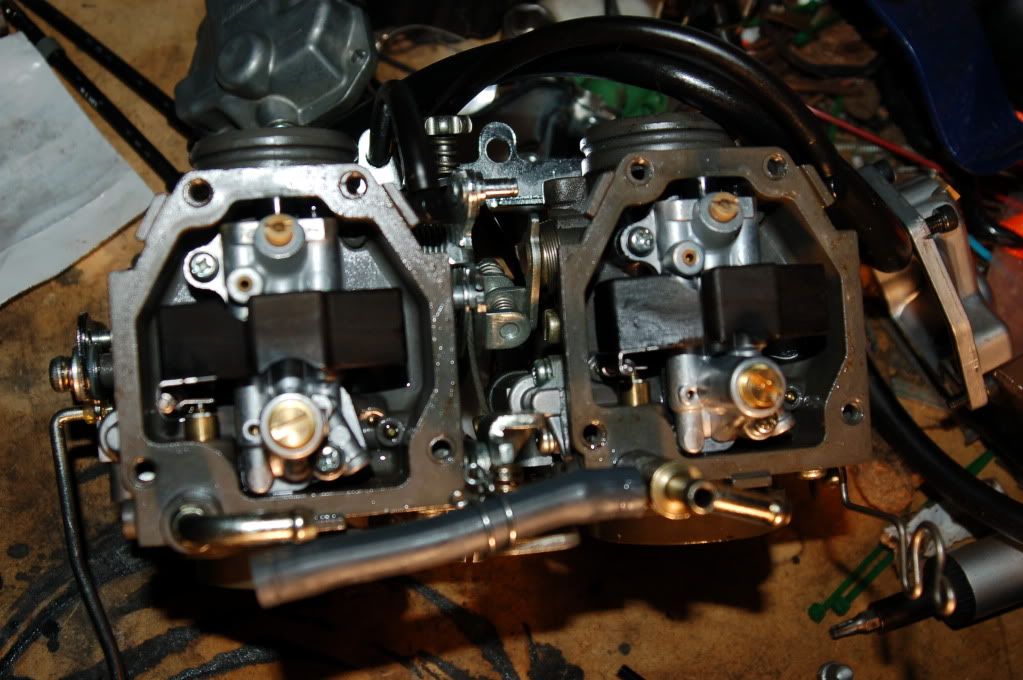
DSC_0053.jpg

DSC_0052.jpg


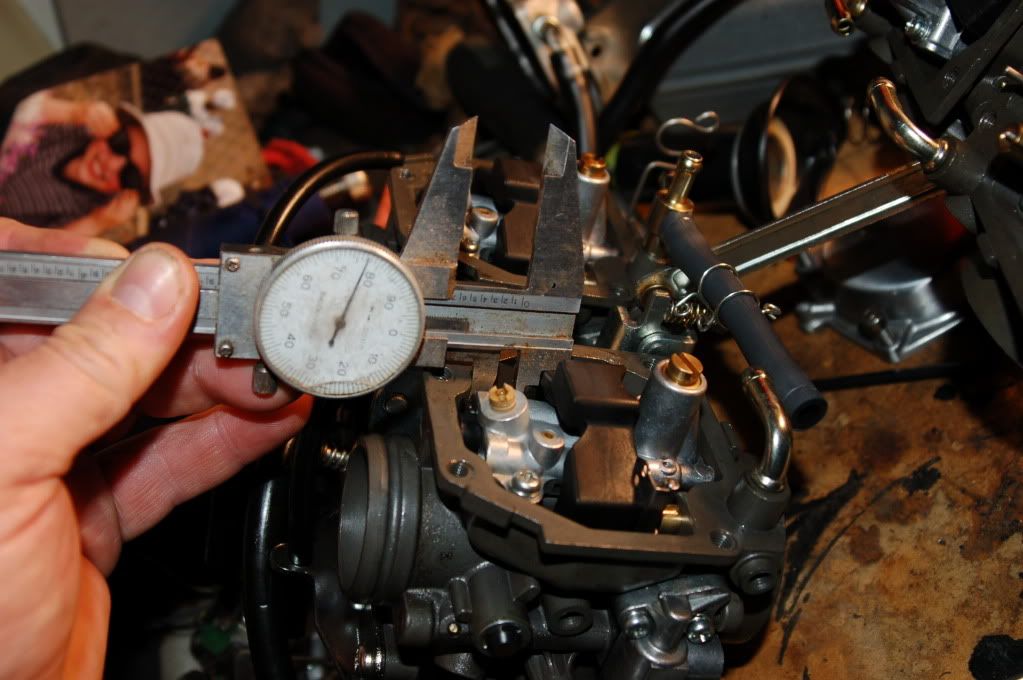
And here is where I am measuring from.
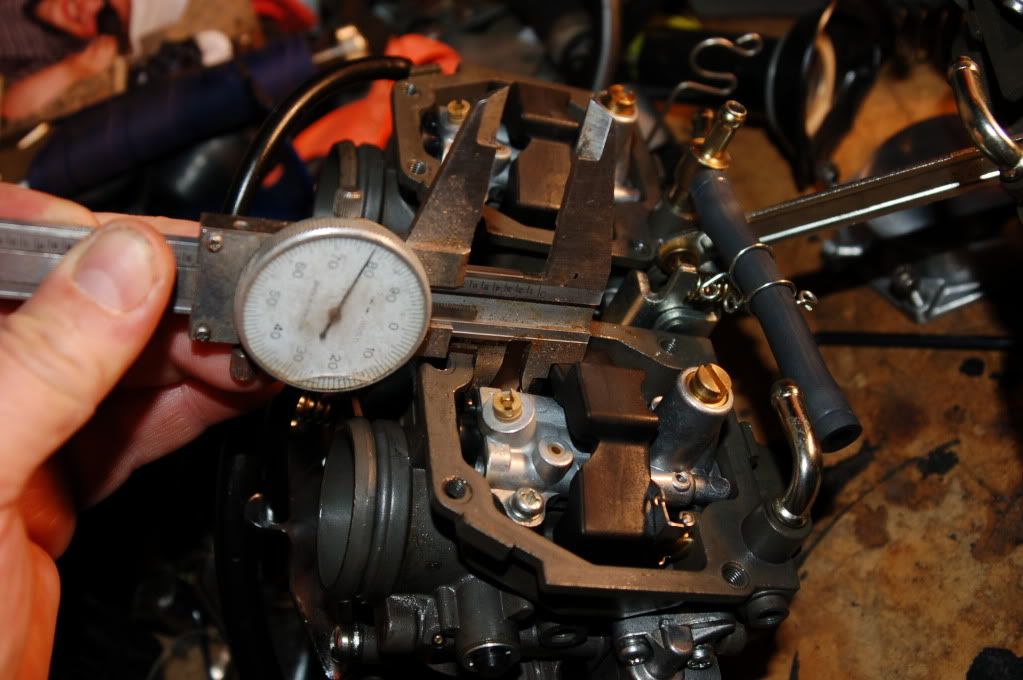
DSC_0055.jpg

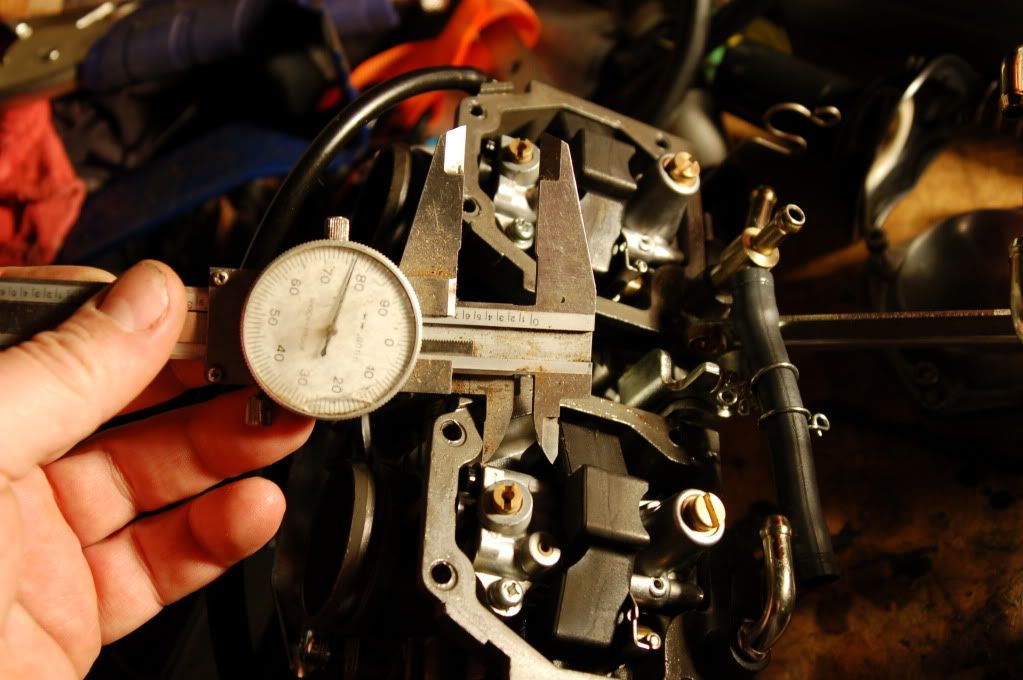
DSC_0056.jpg

And this is the reading I have.
DSC_0057.jpg


Am I measuring from teh correct place? Do these floats need to be adjusted?
 
See that little casting circle? Lookright through the center of the float w/the carb upside down. Then check threads on a wet check. You may be right on the money or, very close. It sometimes requires another removal.
Steve
 
I hate to point this out, but whom ever carbs these are, why is one of your needle valve tubes much lower than the other? Won't this throw off your float level adjustment if it isn't seated correctly or more importantly, if it's loose? Why don't people just do the wet level adjustment instead of doing the measuring guessing game. The wet level measurement gives you an accurate measurement of your actual fuel level. I'd rather measure fuel than air unless one of you knows a way to get the bike to run on air.....especially since gas prices are ripping us a new one!!!!! I'm just sayin....
 

Attachments

  • carb.jpg
    carb.jpg
    135.6 KB
I think the point is that this 'dry' setting can be made (and adjusted) while the carbs are open on the bench.

The 'wet' reading can only really be made once everything is put back together, and then if you need adjusting you have to take it all apart again to reach the floats and bend their tabs! :bang head:

So it makes a lot of sense (to me) to have a way to get very close (if not spot-on) dry on the bench!

I used this method when I rebuilt my carbs, and the wet reading confirmed I was close enough to not bother going back to adjust. Just my 2 cents of course..

+1 to G's comments. I had to pull my carbs 3 times to readjust / fine tune to get the wet reading to the 17mm mark .....finally. I was well worth it. The original float settings from the factory on my 06 was way rich, around 13 - 14 mm on all four carbs.
 
You don't have to have the carbs together and on the bike to do the wet level check. Just get a clear tube that fits over the fuel inlet tube on the carb. I use one about 4 ft long.

1. Get two clear tubes and a piece of wood to set the carb on. I use a 1"x1" about a foot long. You need one measuring tube to fit sung over your black plastic drain nipple and have it long enough to make the wet measurement just like in the wet measurement post. The second clear tube should be about 4 ft long and fit snug over your fuel inlet tube (coming from the fuel pump) on the carb.

2. Loosen the drain screw just like in the wet level measurement post.

3. SLOWLY suck some gas out of a gas can with the 4 ft hose...but make sure you stop before it gets in your mouth!!!! It tastes like shit....trust me!!!!! Cap the suck side of the hose in your mouth by covering it with your tongue or bite down on it so when you take it out of the can the fuel doesn't drain out.

4. Take it out of the gas can and slip it over the fuel inlet on the carb. Lift the hose full of gas above the carb and let gravity do its thing. When the float has pushed the needle closed, the fuel in the feed tube will stop draining into the carb.

5. Make your wet measurement.

6. Note your reading and drain the carb by putting the measurement hose in the gas can you are using and let it drain.

7. If you are off, then bend your tab and repeat.
 
The more posts I read, the more confusing this had become for my fragile little brain. If the design of the carb compartment discussed here varies that much then the total volume inside the compartment would vary which would mean even a wet (volumetric measure) would not be accurate from one carb to the next, am I wrong? After all the idea is fuel level covering all the jets at the right level so they neither starve nor flood but equally important is the shut off needle. If inside volume varies or if the shut off needle's position is different height, would it make dry adjustment simply an educated guess at best?

Am I missing something or do I need to have a saki or two to get this? :ummm:

Wouldn't it make more sense and be more accurate to measure using the red or even the blue line as a reference point?
21834642.png

Or even holding the carbs at an angle till the floats barely close the shut off needle, then using the edge of the float to match to a predetermined figure?
 
Am I missing something or do I need to have a saki or two to get this? :ummm:

Maybe you do :biglaugh: It's about the actual level of gas in the chamber - the float position is just a guide to achieve that level based on the fact that most of our carbs and floats are manufactured to close tolerances and so very very similar in measurements.

How did you go about attempting to move your needle valve seats into the carb bodies to help with your tab adjustment range?
 
dry adjustment simply an educated guess at best?

QUOTE]

Dry level measurement IS just an educated guess, that's why you ALWAYS verify your setting with a wet level check.

If everything is 'normal' inside the carbs....brass seat is shouldered to the proper depth, float doesn't leak, etc....then these dry level methods will work fine. If something is a little different then you will have to go thru the dry set/wet level check a few times to get it right.

Tip #1: Install allen bolts in the float chamber cover for easier removal.

Tip #2: Use a proven 17mm set carb as a pattern and fab a 'gauge' for the next carb clean/adjust project. (I used the plastic top to a vitamin bottle)
 

Attachments

  • 100_2497.jpg
    100_2497.jpg
    109.6 KB
dry adjustment simply an educated guess at best?

QUOTE]

Dry level measurement IS just an educated guess, that's why you ALWAYS verify your setting with a wet level check.

If everything is 'normal' inside the carbs....brass seat is shouldered to the proper depth, float doesn't leak, etc....then these dry level methods will work fine. If something is a little different then you will have to go thru the dry set/wet level check a few times to get it right.

Tip #1: Install allen bolts in the float chamber cover for easier removal.

Tip #2: Use a proven 17mm set carb as a pattern and fab a 'gauge' for the next carb clean/adjust project. (I used the plastic top to a vitamin bottle)


good tips dan-o, im just wondering is that a carb from your new project? the ahhhhh 5 cylinder max? must be since its labled #5:ummm::punk::rofl_200:
 
good tips dan-o, im just wondering is that a carb from your new project? the ahhhhh 5 cylinder max? must be since its labled #5:ummm::punk::rofl_200:

That IS part of the 5 cylinder max, as you know it's a smaller cylinder than the other 4 and will be used as a pony motor to help fire off that oversize V-4....but I can't give it all up in this thread, can I!! :rofl_200:
 
Thank you very much Danny!
I used Sean Morley's photo as a guide not the one Mark posted which was originally taken from Ice Cube or something. Sean's photo was a bit more clearer. I adjusted the floats to the circle as all the brass seats appeared to have been soldered the same. Then using the digital caliper I double checked and they were all right at 1.124"-1.125" so I think I am good to go.
Before 2 were around 1.128-1.130 and two were around 1.116" and that was the side that backfired once or twice initially. I am also replacing the #170 Main Jets with #150s that Sean is sending which will hopefully make this beast roar smoothly again. :eusa_dance:

PS. I tried to get stainless steel allen bolts but neither Home Depot or Lowes had any. Ace Hardware were out of them but they were also black and not stainless either.
I replaced them last year with stainless steel phillips bolts and they are actually not bad and come off easy enough since I got strong enough arms but I wouldn't mind allen bolts as long as they are stainless steel so they don't rust.
Any idea where I can find them, even online?


Be sure to verify by doing a wet level check and you should be all set.
 
Hi guys,

85 maxx here. Ripped out carb rack for first time. Tearing apart carbs for first time, crossing my fingers on re-assembling them. I want to confirm float level height.. WHAT METHOD DO I COMMIT TO? Things seem slightly unclear with the whole "moon on casting thing".. I did see that picture .117 or hwatever to "top" of the bototm of the float...DO I commit to that"?
I don't want to have to rip out unit again and again to adjust, nor do I think i would be able to tell that that is what would be needed...

Also, I have just started and am on Carb #1 based on repair manual. I have carb kit with replacemnt 0-rings and am not sure where they ALL go, specifically. Also, I do not know how to remove the "seat". the needle slides out once you take remove the float, but how do I remove the seat? I don't think they need replacing but since I have new, I might as well. Does the seat twist out like a screw? I see a couple of threads on the new one... does it slide out? it seems stuck, not sure hot to remove the seat or with what tool to replace needle and seat.. help?

http://www.youtube.com/watch?v=GpGjxLsKBFo

Also, source says I could have defective CDI/TCI....waht is that? replacement cost?

Source also says could be pulse pickup coil? WHat the hell is that? Replacement cost?
 
hi mark.

I am having problems with fuel float heights. The size shown on your photos of 1.125 . what position is the needle valve to calculate this stated size. Is it just the weight of the float resting on the needle valve. cheers kk
 
Last edited:
ok ive been reading threads about setting dry float heights but still not sure so i will ask and see if i can get a answer and all so a picture of where to measure the float height reason i want to check is im getting piss poor mpg and smells really rich to the point my eyes get sore when tinkering with the carbs at tick over in my garage carbs are balanced all jets and passage ways have been cleaned and blown through
thanks simon
 
Back
Top