Geek_Law's V-Max Transformation

VMAX  Forum

Help Support VMAX Forum:

This site may earn a commission from merchant affiliate links, including eBay, Amazon, and others.
Let's see ... here's some quickie notes on mounting the front busa calipers on a pre-93 forked max.

I ordered Sean's adapaters.

I ordered the ebay rotors.

I ordered some busa 6-pot calipers.

I finally ordered some new lines, but currently have the OEM lines hooked up because the new ones have not come yet, but they really have nothing to do with hooking up the busa adapters, and you don't actually need them.

Pics of the rotors and calipers are below, but here is what you do.

First, raise the bike and remove the front wheel.

Second, remove each of the rotors by pulling out the bolts and throwing the new one's on. This seriously couldn't be easier once you have the wheel off. However, get some proper hex head sockets (allen head) and a good big ratchet, because mine were glued in with lock tight that was 20 years old and an absolute bear to remove. I started using just "L" shaped allen wrenches and wasn't having much luck. It's doable, but a pain in the ass. My sockets and breaker bar made quick work of the bolts.

Ok, fine, get the wheel mounted back on the bike.

Assuming you have the calipers removed, loosen and remove the brake line feed for each caliper. It's gonna make a mess, so enjoy that.

Ok, set the old calipers aside. Hang on to the two copper washers and banjo bolts from each caliper though, you can use them on the new calipers.

Now mount the busa adapater from Sean. It goes upside down, so both holes are up top and the outside hole is pointing away from the forks.

You need to get a nut that threads on one of your existing caliper bolts, and then you ALSO need to get a second SHORTER and non-flanged bolt to hook it all up.

Put the original bolt and new nut through the upper bracket hole closest to the forks. Use some lock tight and tighten it up.

Put the other existing caliper bolt through the lower hole, the adapter, and the new busa caliper, and finally put the new non-flanged shorter bolt through the adapter and the busa caliper.

Carefully check the clearance of the rotor through the caliper. My rotors rubbed the calipers, just ever so slightly. I finagled with the bracket and got the RH one to work great, but the LH one would not co-operate. I ended up having to shave some metal off the inside arc of the caliper to give the router enough clearance. I'm not gonna say how I did it, but be creative, and if you need to out some metal, then "git'er'done."

Ok, you should be mounted up. Do both sides obviously, admire your work, and then hook up the stupid brake lines or you won't be stopping anytime soon.

If you don't know, one copper washer goes on each side of the banjo. Screw that sucker into the caliper, tighten it down, and then viola, you have totally inoperable brakes.

Remember the mess you made with the fluid? Yeah, get out your brake fluid, vibrator, tubing, drain bucket, towels, and bleed the lines. Ugh, I hate that part.

Hopefully your new busa brakes work. Actually, I'm hoping mine work. I'm hoping I put them back together correctly after powder coating and that all the seals are good. I'm hoping that I can get the new lines installed and get them bled and hopefully have some decent braking power up front. We'll see. It will probably be at least a month before I can test ride the bike. Good luck. Here are some pics that I snapped.
 

Attachments

  • SSPX0897.jpg
    SSPX0897.jpg
    74.9 KB
  • SSPX0898.jpg
    SSPX0898.jpg
    66.2 KB
  • SSPX0899.jpg
    SSPX0899.jpg
    80.1 KB
  • SSPX0900.jpg
    SSPX0900.jpg
    80.5 KB
  • SSPX0901.jpg
    SSPX0901.jpg
    37.5 KB
  • SSPX0902.jpg
    SSPX0902.jpg
    41 KB
  • SSPX0903.jpg
    SSPX0903.jpg
    50 KB
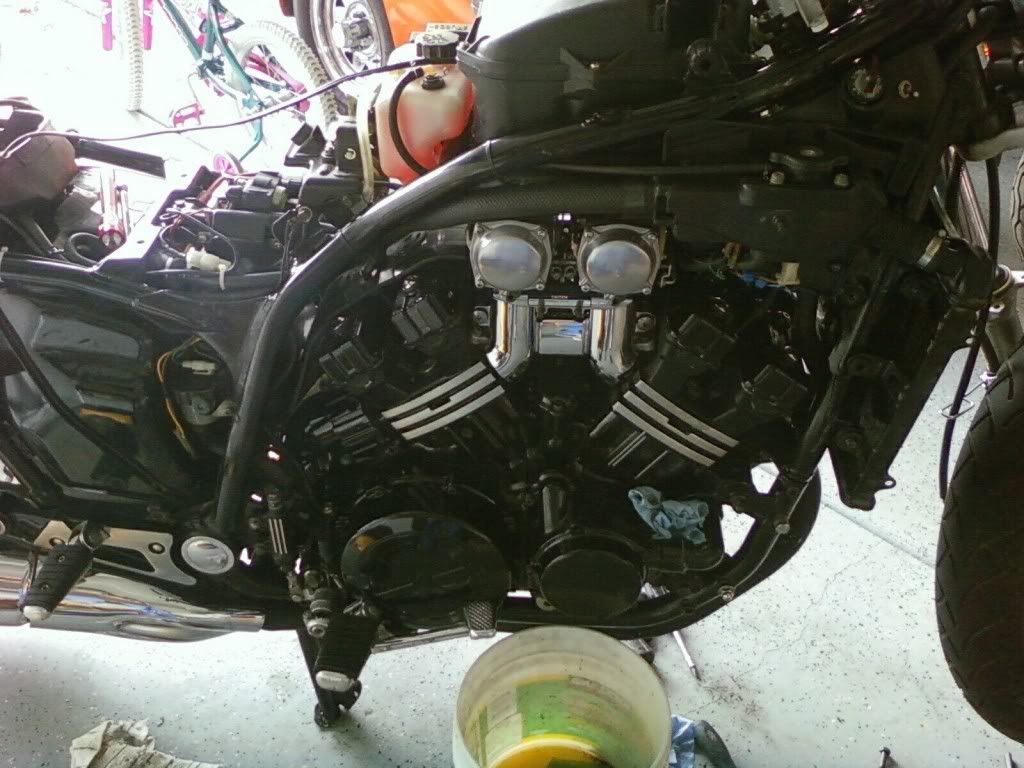
Ok. Last post for the night here. We got all the powder coated engine parts back, and so we proceeded to mount all the various covers back onto the engine. We didn't get the valve covers back on yet, but everything else made it back on.

Oh, a couple of wacky things happened. One of the water pump cover bolts were so rusted that the bolt threads were destroyed pulling the bolt out. Ace didn't have any long enough, so I need to get a 2.75" long M6 bolt. Then, somehow, there were only 4 of the six bolts in the middle gear cover plate! I have no idea what that was about. Maybe the vibrated out, I don't know. Very strange. Anyway, I'll need to replace those too.

I'm looking forward to getting the valve covers back on, some oil in the bike, some radiator fluid, and see if she still runs.

Here are some pics:
 

Attachments

  • SSPX0780.jpg
    SSPX0780.jpg
    57.3 KB
  • SSPX0808.jpg
    SSPX0808.jpg
    85.8 KB
  • SSPX0874.jpg
    SSPX0874.jpg
    47.8 KB
  • SSPX0876.jpg
    SSPX0876.jpg
    62.5 KB
  • SSPX0877.jpg
    SSPX0877.jpg
    58.6 KB
  • SSPX0880.jpg
    SSPX0880.jpg
    57.3 KB
  • SSPX0904.jpg
    SSPX0904.jpg
    54.6 KB
  • SSPX0905.jpg
    SSPX0905.jpg
    52.4 KB
looks good so far. u didn't have to split the rear caliper did ya? are u talking u had to split them to rebuild them or??
 
Couple of notes about your great instructions on wheel and brake rotors removal and fitting:

- when removing the front wheel, you only need to loosen the pinch bolt, not remove it.

- when removing the old (stuck) rotor bolts, it really helps using an impact driver with the correct allen bit to get them loose.
- when refitting the rotor bolts, you should always use blue loctite thread compound as per instructions in the service manual, to make absolutely sure they never get loose from vibes.

And then I also have a question: when you fitted the front rotors, were you able to align them? I mean, if you look through the front wheel, are both rotor's hole patterns in the exact same place?
 
looks good so far. u didn't have to split the rear caliper did ya? are u talking u had to split them to rebuild them or??

Oh, sorry. We had to split the front and rears so that the internal seals would not melt in the powder coating oven. It's actually no big deal once you get inside them. There are a couple of small seals that connect the fluid channels from one side to the other, then just the bolts to hold them together. The pistons and ring seals have to go in of course, and that's the part that I suspect would be impossible without splitting them.
I like the chrome parts :)
:ummm:
I suppose I could go all chrome. Of course, I'd have to take everything apart again. Ugh.

Couple of notes about your great instructions on wheel and brake rotors removal and fitting:


- when removing the front wheel, you only need to loosen the pinch bolt, not remove it.

[[Ah! Makes sense. -SKH]]
- when removing the old (stuck) rotor bolts, it really helps using an impact driver with the correct allen bit to get them loose.

[[That would definitely work too, and it wouldn't be the first time I've used an impact on a motorcycle ... or a hammer :confused2: -SKH]]
- when refitting the rotor bolts, you should always use blue loctite thread compound as per instructions in the service manual, to make absolutely sure they never get loose from vibes.

[[Agreed. Mine had so much old blue glue on them that I felt pretty safe. -SKH]]
And then I also have a question: when you fitted the front rotors, were you able to align them? I mean, if you look through the front wheel, are both rotor's hole patterns in the exact same place?
[[Hahah ... not unless it happened by chance! I the thought didn't even cross my mind. I'm sure you could, since each is symmetrical and I'm sure the wheel is as well, but I just threw them on. -SKH]]
 
Couple of notes about your great instructions on wheel and brake rotors removal and fitting:

- when removing the front wheel, you only need to loosen the pinch bolt, not remove it.

- when removing the old (stuck) rotor bolts, it really helps using an impact driver with the correct allen bit to get them loose.

- when refitting the rotor bolts, you should always use blue loctite thread compound as per instructions in the service manual, to make absolutely sure they never get loose from vibes.

And then I also have a question: when you fitted the front rotors, were you able to align them? I mean, if you look through the front wheel, are both rotor's hole patterns in the exact same place?


And to add to this... I know G said blue loc-tite which is ALL you want to use on anything with aluminum in the mix. Red holds so tight you'll actually pull the threads off. SO... ONLY use blue.

Chris
 
The middle drive cover has one screw with a sealing washer on it. Make sure you put it back in the same hole or you'll have a leak.
 
The middle drive cover has one screw with a sealing washer on it. Make sure you put it back in the same hole or you'll have a leak.

The sealing washer ... where does it go? In the bottom hole on the OUTSIDE right? It WAS in the bottom and on the outside, and that's consistent with my interpretation of the schematic, but confirmation would be nice. I'm an anti leak kind of guy.

Or does it go on the INSIDE? Or does it go somewhere else?
 
Great write up for the front wheel removal so I have "stolen" it and placed it in the How To section.
 
Hey GL, It sure does look like your doing a great job on your rebuild. I just read your thread on wheel removal. My question is about your new rotors. Where did you purchase them at? Do you remember what they cost?
Keep up the nice work.

Kevin

I just got this message from "ksnick"

So Kevin, the rotors are the ebay specials. I couple of folks have tried them and liked them, so I took the leap as well. They look great, arrived in due course, and all seems well, but I should note, I have NOT TRIED THEM as of yet. My bike is not currently functioning, so I have no hopes of testing the new front rotors for at least a month.

Anyway, they are the YZF R1 1998-2003 rotors sold here: http://cgi.ebay.com/ebaymotors/ws/e...0371946420&viewitem=&sspagename=STRK:MEWNX:IT

I paid $185.00 between shipping and the price of the rotors.

Good luck with your project!

GL
 
STATUS UPDATE:

Not too much to share. Went to ace and got a couple of bolts to finish installing the busa calipers. I had bought short flanged bolts, but the flange made the heads too big since the holes on the adapter are so close together. Had to get a narrow head bolt without a flange, and that worked great.

Then I re-installed the valve covers. Let me just say that I'm questioning whether it was worth all the effort to remove them for powder coating. They are a bear to get in and out. They really look cool (I'll post some pics later) but seriously, you have to remove the radiator, a bunch of the servo stuff, the air box, radiator hoses, plug wires. Ugh.

I don't know if the bike runs or not because I need to add oil and radiator fluid. I gave up at midnight last night and went to bed.

But ... it's almost back together mechanically. The tins should be a cinch to re-install once I get them, hopefully this weekend (my painter pushed me out another week in predictable fashion).

Then, its just the electrics. I need to install new blinkers, front and back, install the new tail light, install the new horn, and wire in the new horizontal side license plate mount that I rigged up. I'm thinking it may be finished within 2-3 weeks now. We'll see. Hopefully it still runs and I don't spring any oil leaks after having removed all the engine covers and radiator hoses.
 
Oh! I do have 2x questions if anybody happens to still be monitoring my little journal here ... .

[1]: The plug wires on the rear cylinder go into this funky box just above the battery. I've never seen anything like these. I basically just shoved the wire back in the hole and tightened it down, but I'm sure that I couldn't see bare copper or metal inside the wire. It looked kind of bluish. Is this normal? Should I get new wires or check out the COP mod? Input is appreciated if you are in the know on such things.

[2]: Secondly, there is a hose beneath the air box that clamps onto the bottom of the box toward the rear. I can touch the hose, but try as I might, that sucker never did get re-connected. Is there a trick? Do I need to really worry about reconnecting it at all? I don't like leaving things unhooked, as I tend to think that they are there for a reason, but I seriously couldn't get that sucker reattached.


[1]. Thats your coil. The cops replace that and run straight wires from the yellow plug right to the coil which is on the plug itself. cleans up the area nicely. yea the bare wire is how its supposed to be, its not pretty. the blue/green i have on mine too, i think you can use dieletic grease to help that out. some guys cut 1/2" off o fthe wire so u get some fresh wire to use.

<opinion>
COPs are nice, some have had a varying degree of luck. I would take this time to check all your coils and see if they have any cracks. If they do, test them, and if they test OK then silicone them shut. If they don't test OK, you're going to spend about the same for 1x coil as it is for the whoel COPs set up. goto COPs at that point
</opinion>

[2] mine is kind of squirely, its good to hook it up as its the oil puke hose i believe is the technical term. u can try to move the reservoir out of the way and lightly use some long needle nose. mines never really been on right, and i get oil on my carbs and that area of the bike every once in a while.
 
[1]: The plug wires on the rear cylinder go into this funky box just above the battery. I've never seen anything like these. I basically just shoved the wire back in the hole and tightened it down, but I'm sure that I couldn't see bare copper or metal inside the wire. It looked kind of bluish. Is this normal? Should I get new wires or check out the COP mod? Input is appreciated if you are in the know on such things.

Just like Garrett said. Check your wires and coils are good, if not do the COPs mod. You can also trim the ends of the HT wires if they're long enough. Those wires also often fail, so replacing them is always a good idea.

[2]: Secondly, there is a hose beneath the air box that clamps onto the bottom of the box toward the rear. I can touch the hose, but try as I might, that sucker never did get re-connected. Is there a trick? Do I need to really worry about reconnecting it at all? I don't like leaving things unhooked, as I tend to think that they are there for a reason, but I seriously couldn't get that sucker reattached.
Simply remove the coolant reservoir (slide it up) and let it hang (upright) to the right side.
Then you can stick a couple of fingers under the elbow in the oil vent hose, and hold it in place while pushing the airbox nipple down onto it. Works every time
for me, and I even leave the spring clip in place (it's oily rubber so it goes onto the nipple easy).
 
If you have any doubts about your wires you can always buy the wire only. It is cheap at the auto parts store.

As far as the hose to the air box goes, that is a crankcase breather. Oil will come out of that tube and go on your carbs/motor if not connected properly. You can remove the coolant reservoir by pulling up on it. Some people just leave it hang there, I just remove it totally, it only takes a couple seconds. You should be able to push the breather hose back onto the air box at this point now that you have some room. I didn't have much luck with the stock "spring" style clamp holding it in place, or sliding it back over the nipple. I replaced the spring clip with a typical hose clamp. A long, thin blade screwdriver will work to tighten down the hose clamp.
 
Awesome feedback gamorg, Naughty, and mabdcmb. Thanks so much! I'll fix the puke hose now that I know the trick, and I'll check out the wires and perhaps the COP mod in more detail. Maybe I'll just start by sacraficing a couple of random plugs to get the donor wires and see if that makes any difference. The bike was running fine, running great actually, but I'm not convinced its running tip top. A weak coil connection could make things less than optimal.

Thanks again,

GL
 
Did a little more work today. Nothing big. I called the painter again because he pushed me from last weekend until this weekend, and low and behold ... yep, still is not ready. Actually he's just ignoring my calls.

This is my guy that does amazing work, and is super cheap, but bloody painfully and horribly slow. You really have to have some serious patience to work with him. Anyway, still no painted tins for me.

So I installed the blinkers and the tail light and got the bike running again.

First, I added nearly 4 quarts of 20-50 semi synthetic oil. I couldn't find 20-40 per the manual, so I figured 20-50 would work. If I'm crazy, then please, somebody tell me.

Then I added nearly a gallon of radiator fluid into the over flow and the radiator cap.

Then I tried to start the bike, but nothing at all. I realized it wasn't getting fuel, and I hooked up the tach and temp guage and apparently, there is something in inside that instrument cluster that was keeping the fuel pump from spinning up. Once that was connected, she started right up. Boy ... that sucker sounds like crap without front pipes!

So then I installed the pipes. Ugh. What a pain. I painted them black with a rattle can using fire paint, good for 1300 to 1800 Farhanheit, so hopefully that will work out. We'll see.

So then the bike sounded pretty good, but she was leaking radiator fluid like crazy because I still don't have one of the super long 2.75" M6 bolts for the water pump cover, but it held enough to run the bike for a while.

1257025707.jpg


Once that was all done, I took to the blinkers.
 
Ok, so I wired in the new horizontal license plate mount, the new LED brake tail light, and the front and rear blinkers.

All are 3-wire dual filiment or dual intensity, so I have running lights, and then also either blinkers or brake lights, depending on the device.

Somebody was asking how to do these, and my best advice is to simply get your blinkers or tail light, or whatever you want, and then go searching for wires that meet your needs. With LED's the load is so small that you are not going to fry any wires. With small filiments, you are probably ok, but you should start getting nervous if you are running some super high intensity lights.

Anyway, my brake light and license plate mount are pure LED, so no worries, and then the blinkers are filiments, but so were the ones that I was replacing, so no worries. Really the only addition was the rear running lights for the blinkers.

So here is what I did. I just stuck the new blinkers in the old holes. My set up had three wires. A black wire with a white stripe which was the bright filiment, so I used that for the blinker. A pure black wire which was for the less bright filiment, so I used that for the running light, and then a hot wire, which I seem to think was red.

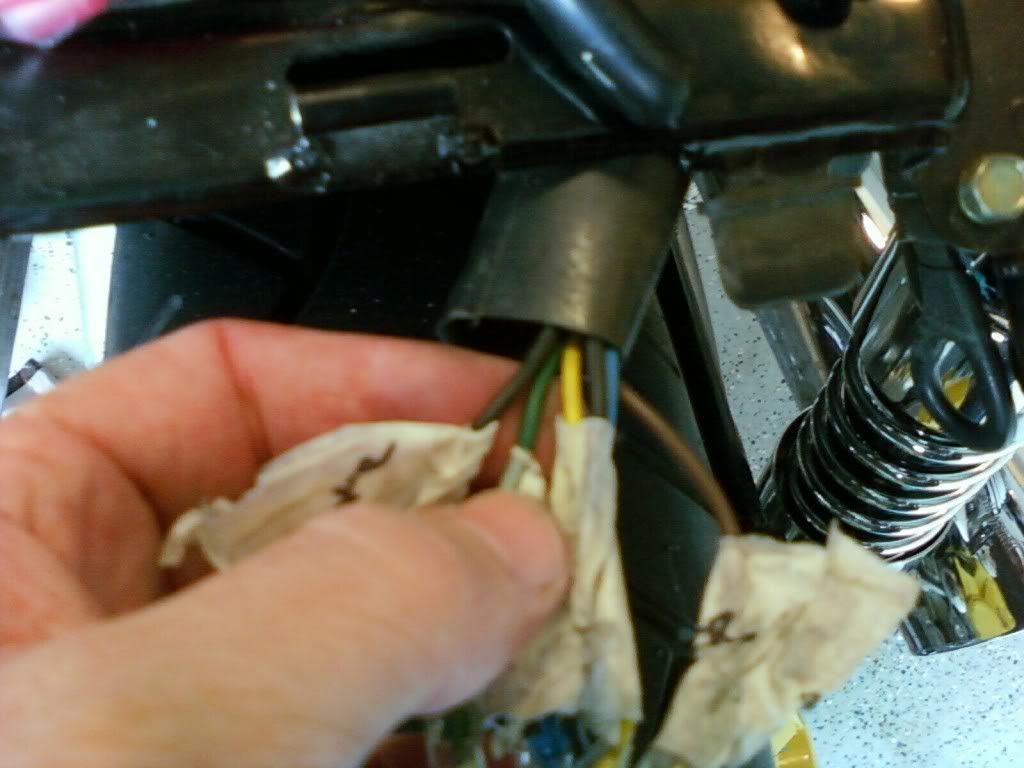
On the bike, the rear already had a hot side which was actually a black wire that split to a red wire with a dual electrical insert, one for each side of the bike's blinkers on the rear. Then there was a dedicated left and dedicated right wire. Here is a pic:
1257031052.jpg


Now I am going from memory here, but the black yellow and blue wires in the middle are ALL to the brake light. The Black was the hot wire, the yellow was the BRAKE LIGHT and the blue was the RUNNING LIGHT. Those will be important in a minute.

The black on the LH side of the pic there was for BOTH of the rear blinkers as the HOT wire, and split to a dual red wire that accommodated each blinker. The green was for the LEFT blinker (I think) and the brown for the right (I think). But seriously, you can just start trying combination with your blinkers and see what works, that's literally how I figured it out. I suppose the wiring diagram would be the authority, but just trying to see what works is reality.

Anyway, so you wire up the hot wire to each blinker, and then you wire up the blinker itself. It's really that easy. I like to use little crimps that I can attach to the raw wires, and then let me connect the two ends together. They are super fast, and nice and clean.

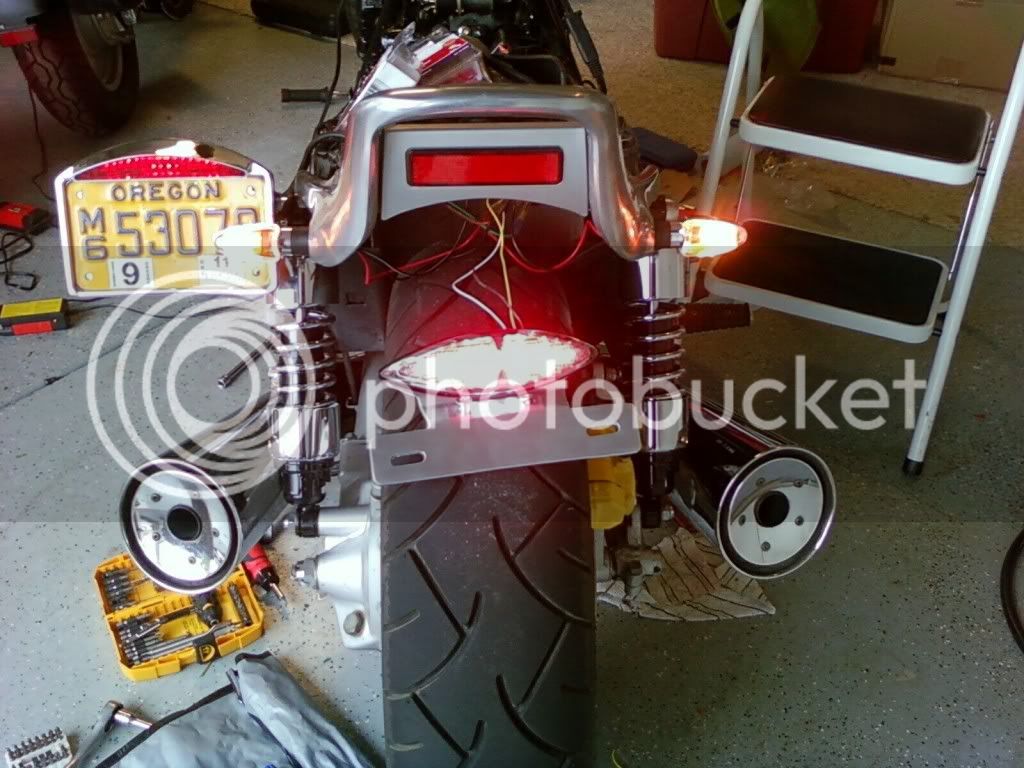
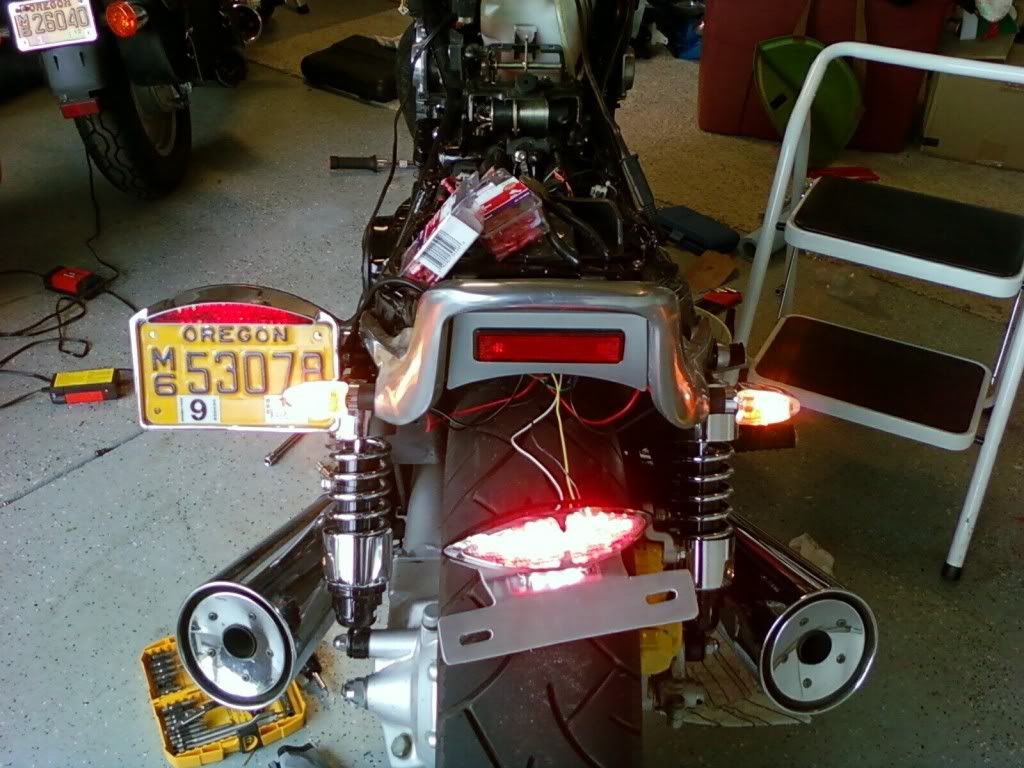
So that get's you a blinker, but I wanted running lights too. So remember that blue wire for the brake light's RUNNING light circuit. Well, you can still the power from just about anywhere for a small filiment like this, but I just split off the brake light running light circuit, since I was moving to an LED anyway for the brakes. So, that third wire on each blinker, the solid black one that ran the lighter filiment, I just wired those directly into the brake light's blue running light circuit and viola. I now have running lights for my rear blinkers.

Here's a pic. The first one is ONLY running lights, and the second pic actually shows one of the blinkers blinking on the BRIGHTER filiment, so its brighter than the other. Kind of hard to tell, but you get the idea.

1257031035.jpg


1257031040.jpg


So that's it. Mechanically speaking, I simply slipped the wires through the OEM blinker hole, and bolted the suckers down.

So, anybody wanting slicker blinkers in the rear, and possibly even running lights in the rear to make you a bit safer, trust me, you can do this. It's super easy. I think I paid maybe $30.00 for these blinkers at the most (rear two), and probably spent 30 minutes to do this. Although it was easier since my rear fender was off.

Best of luck!

(PS. Excuse the spelling errors. I'm not gonna fix it. it's 1:00am and tonight was a fun night ... if you catch my drift. I'm lucky I can still type.)
 

Latest posts

Back
Top